Page 1 of 2
Its Sprag time....
Posted: Fri Aug 30, 2013 12:05 pm
by nickta
Hi All.
Well, its now time to dismantle B1 and replace the
Sprag bearing. All the tools have arrived (if you are after good tools at a very good price, check out
http://www.gbmotorcycleproducts.com/index.asp or their eBay store) so its do it while I have a spare weekend. But then a post comes up on the P750 forum about the nut coming adrift on the Alternator, something I would rather avoid!
My plan was when reassembling to use blue Loctite 243 and torque it up to the value at the back of the Maintenance manual (plus a little bit to be safe!). Has anyone had to dismantle the Alternator and reassemble and come up with a fail safe method, ie replace the nut, replace the washer, use red loctite, hope like mad, etc etc. I like G's idea of using the 2 nuts (see the P750 post), but I am a bit short of time to get this done.
Cheers.
Nick.
Re: Its Sprag time....
Posted: Fri Aug 30, 2013 6:01 pm
by paso750
Loctite 603 is what Ducati recommends, if I remember correctly. That`s quite a difference to the 243 you`re thinking about. Not only is it stronger but it also works if there`s a slight oil film on the surface.
Before mounting the nut it always pays to spray some brake cleaner on the thread to wash any oil off and then either wait a minute or blow it dry with a hair dryer before applying the Loctite.
Don`t torque that "just a little bit more to be safe". That could be the little bit that causes damage or makes the nut come loose. That "a quarter turn more" is for spark plugs or necked-down bolts.
G.
PS: Loctite 2701 may even be better
Re: Its Sprag time....
Posted: Sat Aug 31, 2013 12:42 am
by higgy
Guys, soap and water is best for cleaning especially when using lock-tite products
brake clean sucks
Re: Its Sprag time....
Posted: Sat Aug 31, 2013 12:53 am
by nickta
Thanks G.
No Loctite 603 or 2701 around this part of the country. Have ordered a bottle of 603, so it looks like its wait a bit again

Had a look at my Maint Manuals, the 906 manual has no recommendations for Loctite for any nut or bolt (they are copies of originals, not the manuals off this Web site), and the 907 manual only has a few loctite recommendations, mainly 222, 242 and 601. I don't suppose you have a list of "covers most applications"? Such as :
222: Red, general purpose.
242: ????
243: Blue, medium strength, general purpose.
603: Green, High Strength, slightly oily retainer.
etc, etc.
Cheers.
Nick.
Re: Its Sprag time....
Posted: Sat Aug 31, 2013 10:05 am
by nickta
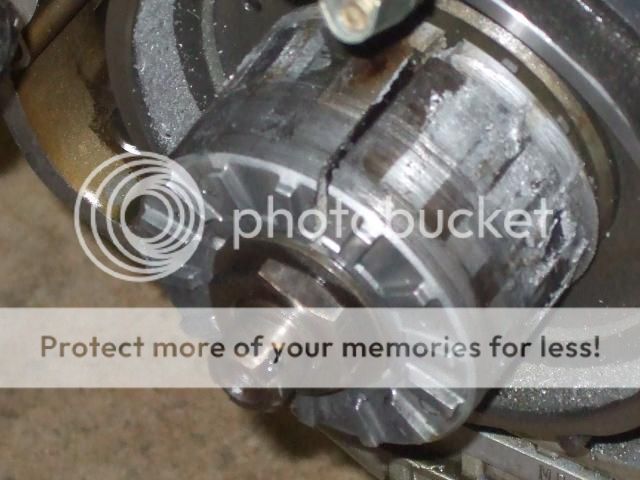
Well, its done. Just waiting for the Loctite 603. Even got the new brush plate in to the Starter motor. Gave it a good clean out with compressed air while it was in bits. The old sprag was still in one piece, but was very loose. The spring that went around it was a bit shagged. Pity the spring out of the seals I had was too thick? Oh well, back to the supplier to see if they have a better spring.
I am going to be a bit tedious with my next question. The washer that goes between the Alternator and the nut, does the high side go to the nut? When i disassembled the unit, I put everything on a nail (through a bit of cardboard), nut first as it came off, washer next, armature etc etc in order. I have a feeling the sprag has been replaced before, so just making sure it was correct when I pulled it apart.
Beer time.
Cheers.
Nick.
Re: Its Sprag time....
Posted: Sat Aug 31, 2013 11:32 am
by paso750
The washer that goes between the Alternator and the nut, does the high side go to the nut?
there`s actually contradictionary info about this. The Haynes manual for the SS/Monster and the original ws manual for the 1098 say the lower side (center hole) of the belleville washer touches the rotor.
The ws manual of the 888 and also the one of the Monster state "The larger side of the Belleville washer and the flat side of the nut must be facing the flywheel." which seems more logical to me.
G.
Re: Its Sprag time....
Posted: Sat Aug 31, 2013 11:59 am
by paso750
I`ve been going through several ws manuals and while the older ones don`t mention what thread lockers to use the newer ones i.e. of Monster or 1098 do. Here they recommend Loctite 128455.
Regarding behaviour under heat it`s superior to 603.
datasheet
http://www.tashev-galving.com/files/spe ... %20128.pdf
Re: Its Sprag time....
Posted: Sat Aug 31, 2013 10:22 pm
by higgy
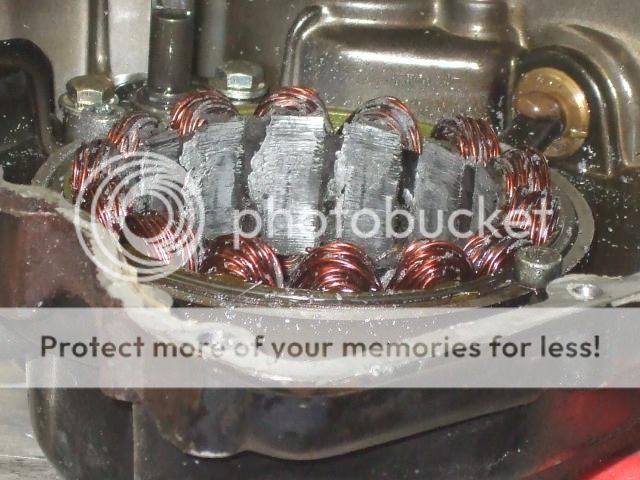
G correct me if I'm wrong here but don't both the 888 and the monster all use a 3 phase Stator ? The 3 phase setup is totally different in design and function from our setups. In the modern setup you 2 similar metals and the washer, in ours you have steel and aluminium on a steel center shaft and the washer. The washer in question requires steel to steel contact as it would tear up aluminium if installed backwards
jm2c

Re: Its Sprag time....
Posted: Sun Sep 01, 2013 4:20 am
by du907
Nickta,
I thought I better chime in on this one.
If you tighten that nut incorrectly (to tight) it can crack and explode the rotor, making it gain in circumference and welding itselt to the stator. This will lock up the engine and spread aluminum particles throughout the engine causing the need to have the motor rebuilt. $$$$
This actually happened to me, and to a few others.
There is a service bulletin to Ducati mechanics out there somewhere about this, so at certain service intervals they re-torque this nut to specs to prevent the nut from getting to tight.
du907
I'm on the side of the conical washer high part (center part of the washer) faces toward the outside of the engine.
Re: Its Sprag time....
Posted: Sun Sep 01, 2013 8:04 am
by paso750
higgy wrote:...The washer in question requires steel to steel contact as it would tear up aluminium if installed backwards
jm2c
You`re absolutely right. If the rotors are a different material mix that would explain why Ducati used the washer one way on some models and reversed on the others.
But the rotor on the 906 & 907ie is the same as used on 900 Monster 93/94, the 900 SS/SL 94-97 and also the 888 >93.
The Haynes manual says one thing, the 888`s shows the opposite


Re: Its Sprag time....
Posted: Sun Sep 01, 2013 9:22 am
by paso750
That service bulletin mentioned seems to have been for Ducs from 99 and newer. Older Ducs had a finer thread on the crankshaft. Later they changed this and it seems some nuts had production tolerances as well that caused a few to come loose therefore their torque should be checked every 6.000 miles.
Re: Its Sprag time....
Posted: Sun Sep 01, 2013 9:43 am
by nickta
Hi Lads.
Looks like we are all on the same page, with the high point of the washer to the nut. It sort of makes sense with an Aluminium rotor, as you would want the most surface area on the Aluminium, as apart from it acting as a wedge if it was the other way. This was how it was when I pulled it apart, but like I said, I would rather get it right than have it all turn to crap! When I got the nut off, there was no visible evidence of any sealant/locker. I thought I would try and torque it up to manual spec once it was altogether. No matter what I did, I couldn't get it to the 176N.m in the book! Once I got the Starter motor back in and gave it a test, the Rotor had a small wobble, so I slackened it all off. It wasn't a lot, and couldn't be seen when turning it all by hand. I have had a look in the Parts manual, and according to that, there is a thrust washer (3 different sizes available) on the crank shaft, but I assume this is on the internal side? Should there be anything between the Rotor and the flywheel, such as item 2 in G's picture of the Strada? (again, sorry for being tedious!)
G: I like that table of Loctite products! Plain language and easy to read. You keep coming up with the good stuff! Again, your patience and ability to help is amazing (you too Higgy!).
Hey du907. What a mess! Warning noted. I think dose of loctite and the lower end of the torque setting is the way to go.
I've attached a picture of the sprag spring (I'm not the best Photographer!). I estimate its about 10mm bigger than it needs to be. The sprags hadn't fallen out, but they were close. Unfortunately the seals I got have a thicker spring, so the new sprag has its original spring. Hopefully its better than the OEM!
Again, thank you all for your input.
Cheers.
Nick.
Re: Its Sprag time....
Posted: Sun Sep 01, 2013 10:16 am
by paso750
are we all on the same page ? I have the feeling I`m bringing up more questions than answers while going through the manuals.
Looking close at the 907 parts catalogue the drawing also looks like the high point of the washer is towards the nut.
What tool did you use to lock the alterator ? The Haynes manuals alternatively suggests to put the engine in high gear and hold the rear brake on but I don`t know if that is really a recommendable method.
#2 in the Strada drawing is the belleville washer we`re discussing about.
Those 3 size shims are inside the engine to correct the axial play of the crankshaft.
Re: Its Sprag time....
Posted: Sun Sep 01, 2013 5:08 pm
by Tamburinifan
This has worked f me +10 times:
There is a washer/shim closest to crank, a way to make it stay in place is to apply some thick grease on its back,
making it stick to crank. If not in place, you see crank end not centered when spinning starter ("small wobble" above?).
Just take it slow & be careful when sliding flywheel onto splines.
Thoroughly clean threads on crank & nut, finishing w alcohol.
Flat side on washer inwards (same on my Monster).
243 Loctite has worked so far, torque according to manual.
Check sprag function & crank end before mounting cover.
Re: Its Sprag time....
Posted: Mon Sep 02, 2013 12:31 am
by nickta
paso750 wrote:are we all on the same page ? I have the feeling I`m bringing up more questions than answers while going through the manuals.
Looking close at the 907 parts catalogue the drawing also looks like the high point of the washer is towards the nut.
What tool did you use to lock the alterator ? The Haynes manuals alternatively suggests to put the engine in high gear and hold the rear brake on but I don`t know if that is really a recommendable method.
#2 in the Strada drawing is the belleville washer we`re discussing about.
Those 3 size shims are inside the engine to correct the axial play of the crankshaft.
Hi G.
Questions bring discussion, discussion brings answers. If it saves one motor from self destruction, then it has been worth the effort.
I purchased a heap of tools from a bloke in England (see link above). I read up on various Web pages and manuals how to hold the Alternator from moving. Just about all had someone holding the rear wheel while in first gear, or holding the clutch basket with a home made tool made out of old clutch plates. I didn't think any of them were a good idea, as you were putting a whole lot of stress through the gearbox. The tool I got was
http://www.ebay.com.au/itm/120793391112 ... 1423.l2649 from Vince. It slips neatly over the rotor and locks on the tabs at the top. It comes with a deep 30mm socket, but the standard 30mm works too. Bonus is you can do the job on your own, as you are on the same side with the tool and the breaker bar (same putting it back together). About the only thing I can pick wrong with the tool is the arm on it is a bit short, and it needs a bit of rag wrapped around it to stop it gouging you hand. A length of water pipe slipped over the handle would fix both, and would allow more force (ie: less effort) on the rotor when tightening it up. I found Vince easy to talk to about the tools, and he was very knowledgeable about what I needed. I got about 10 different tools (specific and various socket type) for about the same cost as the OEM Ducati Alternator tool.
Don't you hate it when there are two #2 in a picture! The #2 I am on about is between #3 and #5.
Hi Gert: Good tip on the grease. Is the washer/shim you are referring to the one that the needle bearings sit on that the driven gear (flywheel?) rides on (#20 on page 12 of the parts list)?
Cheers.
Nick.

