Left engine cover removal
-
Harry
- Posts: 90
- Joined: Mon Aug 30, 2010 3:15 am
- model: 906 Paso
- year: 1989
- Location: Denmark, Western Australia
Re: Left engine cover removal
Hey thanks for the advice, yes i will do an Oil change whilst i am about it that does make sense.
-
higgy

- paso grand pooh-bah
- Posts: 3329
- Joined: Tue Jul 29, 2008 9:50 pm
- model: 907 I.E.
- year: 1992
- Location: Hilltown,Pennsylvania
- Contact:
Re: Left engine cover removal
Yeah what Ken said, forgot about that part 
And I just did this week too
And I just did this week too
Ducati,making mechanics out of riders since 1946
There's no problem so bad that a little fixing can't make it worse! : )
If it ain't broke keep fixin it till it is
88 750
90 906
92 907ie
There's no problem so bad that a little fixing can't make it worse! : )
If it ain't broke keep fixin it till it is
88 750
90 906
92 907ie
-
Harry
- Posts: 90
- Joined: Mon Aug 30, 2010 3:15 am
- model: 906 Paso
- year: 1989
- Location: Denmark, Western Australia
Re: Left engine cover removal
Ok everything has gone well so far, but i am now stuck trying to remove the Alternator is the Nut that holds it on Left hand or Right hand Thread?. I have a good quality Strap Wrench but even it will not grip so that i can get a decent bite on the Nut .

Re: Left engine cover removal
I can't remember if it is a right or left hand thread, follow the thread on the crank to get an indication. You may need the special tool to hold the rotor and an impact gun to get the rotor nut off. Try contacting your local Duc shop to see if they will lend you the alternator tool. For me, using the impact gun by itself is enough. If you don't have any luck let me know and I can lend you mine. There are other more agricultural ways to stop the crank from turning like putting a copper washer between the gears to lock them up or putting the bike in gear but these put unnecessary pressure on other parts of the engine.Harry wrote:Ok everything has gone well so far, but i am now stuck trying to remove the Alternator is the Nut that holds it on Left hand or Right hand Thread?. I have a good quality Strap Wrench but even it will not grip so that i can get a decent bite on the Nut .
This is the tool you're after;
http://www.ebay.com.au/itm/DUCATI-ALTER ... 0747330222
-
Harry
- Posts: 90
- Joined: Mon Aug 30, 2010 3:15 am
- model: 906 Paso
- year: 1989
- Location: Denmark, Western Australia
Re: Left engine cover removal
Thanks Duc906, where abouts are you? I am North of the River in Clarkson. I did try putting the Bike in Gear and doing it that way but had no luck and the Workshop Manual doesnt state whether the thread is Left or Right.
Re: Left engine cover removal
I'm on the other side of the country, Vic, but I'll post it over if you don't have any luck borrowing one from the local dealers.Harry wrote:Thanks Duc906, where abouts are you? I am North of the River in Clarkson. I did try putting the Bike in Gear and doing it that way but had no luck and the Workshop Manual doesnt state whether the thread is Left or Right.
-
paso750

- paso grand pooh-bah
- Posts: 5558
- Joined: Sun Jul 18, 2004 12:00 am
- model: 750 Paso
- year: 1987
- Location: southern Germany
Re: Left engine cover removal
If you put it in gear it should be a high gear and you should also keep the rear brake pressed at the same time.
I don`t recall which thread there is but the flywheel turns counterclockwise when the engine is running, if that helps.
The nut is tightened with about 160NM or so (check service manual) and there will be Loctite, too so no wonder it`s hard to get off. I would not recommend an impact gun unless you really know if it`s a left or right thread. But also then I`d be careful and most definetely not use it for tightening later. It`s crucial this nut is tightened exactly to spec as you may crack the rotor or damage something else.
G.
-
higgy
- paso grand pooh-bah
- Posts: 3329
- Joined: Tue Jul 29, 2008 9:50 pm
- model: 907 I.E.
- year: 1992
- Location: Hilltown,Pennsylvania
- Contact:
Re: Left engine cover removal
it is righty tighty lefty loosey counter clockwise to loosen

you can also stuff a rag in the gears, if you are using hand tools I would not be not be too concerned about doing the high gear rear brake method just apply pressure evenly and slowly. you can slip a pipe over your tool to get more leverage
If you end up doing the impact tool best to be in neutral and make sure your socket fits tight. Grab the rotor with your gloved hand to limit forces transmitted to the rest of the gear train and rod bearings. Loose socket will round it . Also best to replace the lock tab
Ducati,making mechanics out of riders since 1946
There's no problem so bad that a little fixing can't make it worse! : )
If it ain't broke keep fixin it till it is
88 750
90 906
92 907ie
There's no problem so bad that a little fixing can't make it worse! : )
If it ain't broke keep fixin it till it is
88 750
90 906
92 907ie
-
Harry
- Posts: 90
- Joined: Mon Aug 30, 2010 3:15 am
- model: 906 Paso
- year: 1989
- Location: Denmark, Western Australia
Re: Left engine cover removal
First off thanks for your generosisty Ken, thats pretty amazing that you woud be willing to do that. I will try and source that Tool here in Perth today. Yes i have tried the Bike in Gear and Brake on method but not having an assistant this didnt work and was very hard to try and do myself. I have tried with an extension Bar on the end of my breaker Bar but again it didnt work and thankfully i have been trying to loosen it the correct way. I will get my hands on an impact Wrench and then try and get sombody to give me a hand. Watch this space because i will get it off eventually and i really do appreciate everybodys input and advice. The old girl will fire again in the very near future lol.
Cheers
Harry.
Cheers
Harry.
-
Harry
- Posts: 90
- Joined: Mon Aug 30, 2010 3:15 am
- model: 906 Paso
- year: 1989
- Location: Denmark, Western Australia
Re: Left engine cover removal
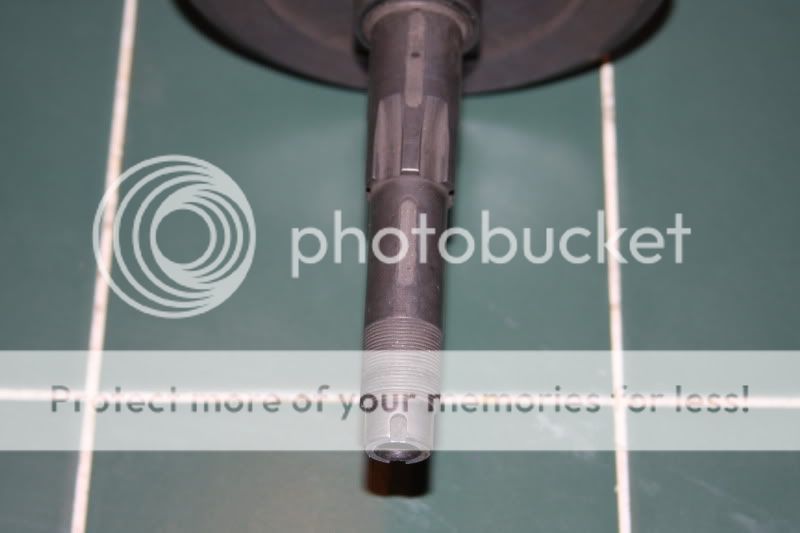
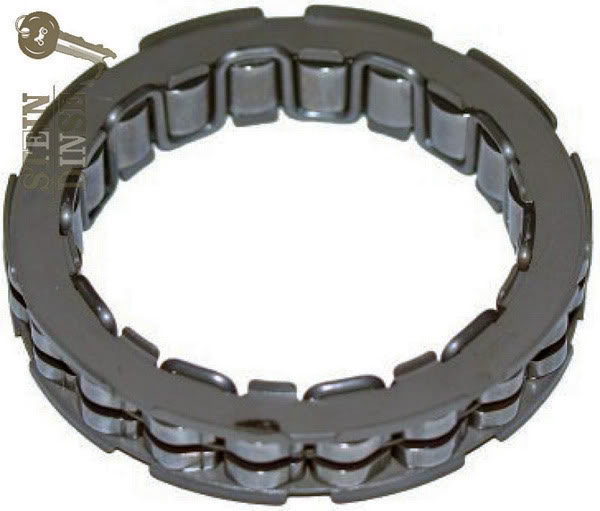
Ok i have had sucess with removal of the Alternator and old sprag, the trouble now is the new Sprag looks nothing like the old "Morse" sprag. My new sprag is a replacement from Bevel Heaven and is SKF Brand. I cannot see any visable problem with the old sprag apart from some wear marks on it and the Spring is still in one piece. With the old sprag there is an arrow which points to direction of rotation i presume but with the new sprag there is no arrow and the only visable difference to one side of it is a small semi circular groove notched into it. Has anyone else encountered a new sprag like this. I am hopeing that i have not been sent the incorrect part.
Re: Left engine cover removal
Could you post a couple of pics so we can have a look at the difference.
-
higgy
- paso grand pooh-bah
- Posts: 3329
- Joined: Tue Jul 29, 2008 9:50 pm
- model: 907 I.E.
- year: 1992
- Location: Hilltown,Pennsylvania
- Contact:
Re: Left engine cover removal
Ducati,making mechanics out of riders since 1946
There's no problem so bad that a little fixing can't make it worse! : )
If it ain't broke keep fixin it till it is
88 750
90 906
92 907ie
There's no problem so bad that a little fixing can't make it worse! : )
If it ain't broke keep fixin it till it is
88 750
90 906
92 907ie
-
paso750
- paso grand pooh-bah
- Posts: 5558
- Joined: Sun Jul 18, 2004 12:00 am
- model: 750 Paso
- year: 1987
- Location: southern Germany
Re: Left engine cover removal
how did you get the nut off ?
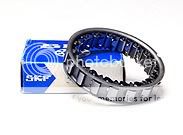
The SKF sprag clutch is this one
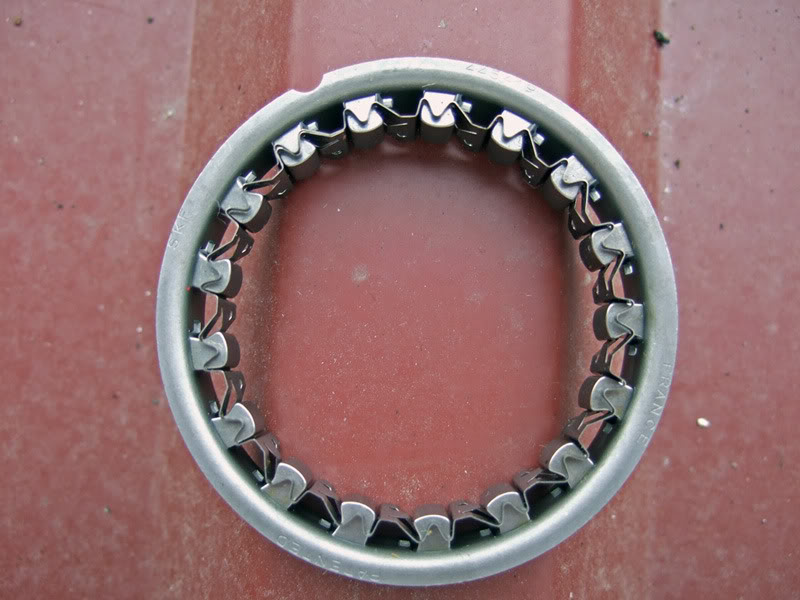
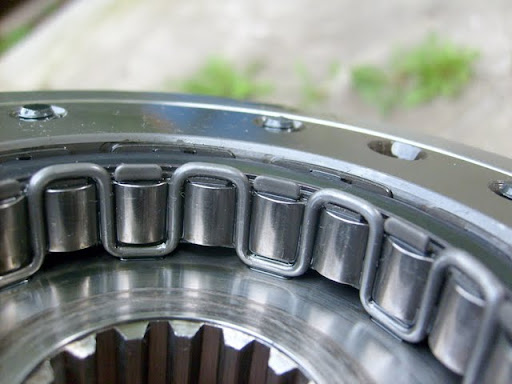
If you look at the first pic you see that the single elements have one a longer edge. This is the locking edge. Also if you look at the outer ring you`ll see where the gaps infront of the single elements are. So as on the first pic the sprag clutch would run free counterclockwise and lock clockwise.
The part that you`ll have to be careful about when assembling is that you`ll always have to keep in mind in which direction the whole flywheel turns when standing infront of the left engine side. If you look at the rear side of the flywheel trying to figure out which way round things turn chances are you`ll reverse mount the starter sprag")
I suppose this is the old type
The SKF sprag clutch is this one
If you look at the first pic you see that the single elements have one a longer edge. This is the locking edge. Also if you look at the outer ring you`ll see where the gaps infront of the single elements are. So as on the first pic the sprag clutch would run free counterclockwise and lock clockwise.
The part that you`ll have to be careful about when assembling is that you`ll always have to keep in mind in which direction the whole flywheel turns when standing infront of the left engine side. If you look at the rear side of the flywheel trying to figure out which way round things turn chances are you`ll reverse mount the starter sprag
I suppose this is the old type
-
Harry
- Posts: 90
- Joined: Mon Aug 30, 2010 3:15 am
- model: 906 Paso
- year: 1989
- Location: Denmark, Western Australia
Re: Left engine cover removal
Yes that is what i have in the new and the old, im sorry but i dont quiet follow your description of the new SKF Sprag but the new sprag has that notch cut into it on one side only is this the side that faces into the Engine?
-
paso750
- paso grand pooh-bah
- Posts: 5558
- Joined: Sun Jul 18, 2004 12:00 am
- model: 750 Paso
- year: 1987
- Location: southern Germany
Re: Left engine cover removal
I don`t have the parts at hand so it`s a bit difficult for me to say.
Take your old parts and check in which direction it locks. (If I`m not mistaking it`s counterclockwise seen from the backside of the flywheel as on pic 14.19a)
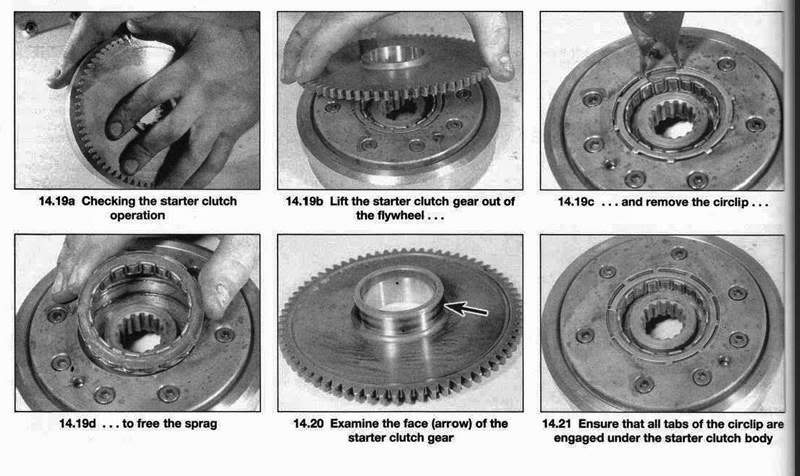
The single bits of the starter sprag tilt in the outer ring. If the notch cut faces you and you`d turn the starter sprag clockwise the elements would tilt as shown and the long edge would make contact with the starter clutch gear, hence lock. Turning in the other direction it would run free.

The easiest is to try in which direction the old part locks and then try the new part.
I`d say the cut out notch faces inwards/to the flywheel when you mount it.
I hope I have no thinking mistake
Take your old parts and check in which direction it locks. (If I`m not mistaking it`s counterclockwise seen from the backside of the flywheel as on pic 14.19a)
The single bits of the starter sprag tilt in the outer ring. If the notch cut faces you and you`d turn the starter sprag clockwise the elements would tilt as shown and the long edge would make contact with the starter clutch gear, hence lock. Turning in the other direction it would run free.
The easiest is to try in which direction the old part locks and then try the new part.
I`d say the cut out notch faces inwards/to the flywheel when you mount it.
I hope I have no thinking mistake