I thought it would be good to begin developing a FAQ for the 750 Paso Forum. We have many excellent threads that have answered the most common and some not so common problems.
What I hope to do is make links to the threads about specific problems/subjects so that folks coming to the forum can have easy access instead of searching. If you have a few favorite technical threads just please link to them here with a short description. It will be a work in progress so lets see how it goes.
DO NOT post new questions here!!
Buying a Paso
You can download the following text as a pdf file here
Generally speaking an 80s Ducati is not more or less reliable than any other bike that age. Many problems are caused by negligence. Regular maintenance is the key to any reliable machine.
The models:
Paso 750
oil cooled, 5-speed gearbox, Weber carb, 16" wheels, 280mm front brake discs, Kokusan ignition (California models: Marelli Digiplex). Very early models used an Öhlins shock instead of a Marzocchi, produced 1986-88
Paso 906
water cooled, 6-speed gearbox, Weber carb, 16" wheels, 280mm front brake discs, Marelli Digiplex ignition, produced 1988-89
907i.e.
water cooled, 6-speed gearbox, fuel injection, 17" wheels, 320mm front brake discs (early models had 300mm discs), Marelli IAW P7 ECU, produced 1990-92
The P750 was available in red, white (pearl) and blue (met.)
The 906 was available in red, dark blue, blue (met.) and grey
The 907ie was available in red and black (actually anthracite)
There were no bikes with yellow or tricolore factory paint. Rumours are that some large dealers offered different colours to get rid of their stock as these bikes were expensive and not selling well.
The white and blue 750 was only produced in small numbers so Ducati started naming them "Limited" during their production. For that reason some of these bikes don`t have Limited stickers, some have the stickers on the paint and others had them clearcoated like all the other stickers on the bike.
The Limiteds were nothing but a colour variant and are technically identical to the “normal” 750.
There were a small number of 750s produced that came with some performance upgrades like modified cylinder heads, flywheel and a larger header. A set of open (race only) Silentiums silencers came with them in a crate.
Identifying these bikes is hard as there's basically no info about them. It can only be done if you have the bike's full history, compare part numbers and remove the cylinder heads. (Rarely the race only silencers can be found on eBay so these are not a reliable sign that the bike is one of the few)
Early 750 models (1986/87) can be identified by a silver upper triple clamp and handlebars and a chromed rear grab rail while on later models these parts were black. The 750s with golden valve covers had an uprated valve rocker setup (with a clip) which allowed an easier valve service. This setup was used on all later Ducatis.
More info can be found in Ian Falloon's book Ducati Belt-Drive Two Valve-Twins restoration and modification
US models came with large rear turn signals on stalks and a full red taillight instead of the amber/red Euro taillight that combines rear lights and turn signals in one housing.
To meet noise or emission regulations the header tubes (from the cylinder to the header cross) from US/Swiss P750/906 have a smaller diameter and the output hole of the silencer is smaller as well compared to Euro models.
Making a decision
Which model will it be ? Every model is particular.
The Weber carburettor on the 750 & 906 can be a hassle but there's plenty of info (in the forum) on how to get this under control. Swapping to later models Mikunis or to aftermarket Dell'Ortos is a common modification.
Matching 16" tires are currently being sold only by Golden Tyre & Shinko (Golden tyre is only a brand / distribution channel of Shinko who`s the actual manufacturer). Alternative sizes can be fitted but may require modifications.
The 906 is heavier than the 750 but compensates this with more torque and a 6 speed gearbox.
The 907i.e. as the next step in evolution eliminated some of the flaws by using an electronic fuel injection and common size 17" wheels. As a consequence it handles differently and it looks a bit different as well.
Spare parts availability is generally not a huge issue although several parts are not stocked by Ducati anymore. There are several other sources besides eBay. It's worthwhile checking (older) Ducati dealerships as some parts are still available and some parts may still be in stock. This may require some patience and digging.
Later Ducati models share some parts as well. *
While low mileage bikes are tempting, bikes that were stored for several years often incur higher consequential costs due to their service backlog and possible long term storage deterioration. If you want a bike to ride consider a good one with a reasonable mileage that shows it's being ridden. You should have less problems and it may work out cheaper in the long run.
Knowing the bike`s history, specially its service history is always a huge plus.
If there's nothing except the word of the seller you may have to count on a full service. Timing belts that were replaced just before years of storage must be changed. "New" 16" Michelin tires are nice for a collector but must be replaced if you plan to ride the bike (the last Michelin A/M59X tire batch was produced in 2005).
In case you're not located in the US and you find a bike with US taillight & blinkers but with a speedometer showing km/h instead of mph and temperature in °C instead of °F be suspicious. An instrument panel showing km/h and °F should also strike as odd (as would be a bike with a Euro taillight, speedometer showing km/h but temperature gauge showing °F). Such a bike may have been imported and equipped with a new or used instrument panel or speedometer. Unless there`s any documentation the true mileage of such a bike is unknown. The seller can tell you anything. (The only chance for verification is to call up the last owner/s if you can find out who it was - be prepared for an unpleasant surprise)
If you're looking for a low price restoration project of course all that doesn't really matter.
Like with every other older bikes it's a benefit if you are mechanically minded and are willing to do some of the work yourself.
Do not buy a bike unseen (i.e. from ebay) unless you're ready to spend some time and money on it.
And last, is the Paso a collectable? I guess you'll have to figure that out by yourself. It's definitely not an investment like a bevel SS or a 888SP model and prices for these bikes have increased very little (if at all) over the last few years. Imo it's a classic you should take care of but which unlike a real collectable you can ride & enjoy.
* side note
when having a dealer or shop check availability for parts as old it's always better to look up the parts catalogue and write down all part numbers before. I may be wrong but I think the Supersport is the earliest model in Ducatis electronic parts program, all older models are only available on microfiche. So some dealers reply they don't have anything just because they're too lazy to dig up the old microfiche reader or simply because they don't have one. They don't have any problem checking availability of part numbers in their software though! So have them at hand.
Things to check when inspecting a bike
Have a small flash light plus a 4 & 5 mm allen key at hand.
Remove the rear and front side fairings if that is possible.
Cosmetics / overall condition
o Is the paint job original, are all decals in the right place and covered by clear coat ? (Note the 750 came with different decals. Early models had "Controlled air flow" on the side)
o Are there parts with a colour mismatch or does the paint show an orange skin that could indicate a repaint ? (If so why was that ?)
o Do the fairing parts have stress cracks (ones around the fairing bolts are normal) or cracks that indicate the bike had a crash or fell over ?
o Are parts like fairing bolts, helmet lock, lift handle etc missing?
o Inspect the steering stops that are located on the bottom of the frame's steering tube above the lower triple clamp. (you'll need the flashlight) Are these cracked or bent or is one of the adjuster screws new or different ? If so the bike has definitely been crashed. This doesn't happen if the bike just tips over.
o A small dent on the upper side of the tank (resulting from the light or starter switch housing hitting the tank) indicates a crash as do scratched handlebar ends/ lower forks/ foot pegs/ exhaust / rear axle & bolt (on the 907ie), bent/scratched brake/clutch/gear change levers or eventually replacement mirrors. In case the steering did hit the tank one steering stop is definitely cracked or bent. In very worst case one fork tube even hit the frame and damaged it
o Are the mirrors original (replacement mirrors from FAR which meanwhile are sold by Ducati as original spare parts don't fit very well and are lower quality. The FAR mirrors are bolt-on not snap-on and can easily be identified by the large hinge-joint next to the mirror glass
o Check the front lower edges of the tank and the area around the filler cap for rust bubbles and if there's little fuel in the tank try to see if there's rust in it (which may occur specially during long periods of storage and a tank not being properly filled)
o Does the clear coat peel from the rims (P750/906) ?
o Is there rust on the frame or exhaust ?
o Are the clear instrument cover or the rear light cracked ? (hard to find)
o Age and condition of original 16” Michelin tires is not a concern and shouldn't influence the price. Neither is getting original NOS (new old stock) tires with the bike as their production was stopped in 2005. Check the tires production date with their DOT number (i.e. DOT 325<I means calendar week 32 of 1995 while 3205 would mean calendar week 32 of 2005). Old tires are a potential safety hazard no matter how much thread they have left
o Are there all keys ? The 750 comes with three (one for the ignition switch, one for the seat lock, one for the helmet lock). The 906 and 907ie come with one universal key plus a copy (the key works for all locks). There may be another small key if the bike has a lockable tank cap
o Does the bike come with its original toolkit and user manual ? (you may find these under the seat in the tools compartment)
o If you smell gas it could be the tank is cracked at the front mount which will require welding or replacement
Technics
o Is there a service history, invoices etc. (for last belt change, valve adjustment, fork oil/ brake fluid change ...) ? If not, is there a shop you can call for confirmation ? According to the official service manual the timing belts should be replaced every 2 years as is the brake fluid. So a belt change and a service before years of storage does not increase the value of a bike. It actually should also not be ridden until belts and fluids have been replaced
o Is the engine dry ? Typical oil leaks can be the drive shaft seal and the belt pulley seals (both after a longer storage), the o-ring between cylinder head and cylinder (specially the rear cylinder), the oil sight window
o A working clock is a plus as they often don't
o Does the ignition switch/key turn with no big effort or does it feel very notchy ? (the whole power for the coils and headlight runs through the ignition switch so bad contacts can cause the ignition switch to fail)
o Does the engine fire up well (not with endless cranking) and does it keep a steady idle also when cold ? Some smoke is normal if it didn`t run for a while but that should be gone when engine temperature rises (a compression test to verify if both cylinder are identical is always good) Note that firing up an engine that has been stored for years takes a little preparation like squirting some oil through the spark plug holes and turning over the engine a few times by hand by turning the rear wheel while in gear. If the last belt change is unknown have the seller start the bike up or ride it before you do (it's his risk then). If you then buy the bike haul it home and only ride it after you serviced it
o Clutch rattling on a Ducati is typical and normal. Excessive rattling could indicate chatter marks on the clutch basket or worn clutch discs (normal wear) If the clutch is hard to operate chatter marks could be the reason that the clutch discs won`t move smoothly. Often this accompanied by problems of changing gears.
o On the 750 & 906 with the clutch slave piston in the clutch cover a squealing noise when the clutch is disengaged (when engine is running that is) can indicate a defective clutch throw out bearing which is relatively cheap to fix
o Shifting through the gears and specially finding neutral should work easily
o In case the lights brighten and dim strongly when opening throttle the electrics may need some attention (Battery low, bad ground connections ...)
o Check the right front swingarm side for white/acid spots. If there are the battery spilled acid which it will do if it boils; mostly due to a bad battery or faulty regulator/rectifier
o Do the dust seals of the fork have cracks and is there an oily line on the stanchion tube if you dive in the fork a few times. If there is the forks oil seals are leaking (If the fork is bone hard and non responsive it probably hasn`t seen any service for a while)
o Check the stanchion tubes and the damper rod of the rear shock for rust, pitting or scratches as later polishing or rechromeing won't be a longterm fix or not possible at all
o Put the bike on the center stand and have someone hold the rear down to get the front wheel from the ground. Push and pull the bottom of the fork legs to see if there's any play (from worn fork bushes or the steering bearings). Also turn the steering fully from side to side. It should fall to each side by itself and with no effort at all if the steering head bearings are ok
o The original rear shock is rather hard. If it feels soft and bouncy or bottoms out it's probably leaked its oil and needs to be rebuilt or replaced. Check if the lower shock linkage is greasy
o Inspect if the brake pads and discs have still more than minimum thickness
o Have a close look at the condition of chain (rust or stiff links?) and sprockets
o Remove the front sprocket cover and check if the engine case has scratch marks or cracks, has been welded or has signs of cold metal repair (these would be signs of a damage & repair caused by a snapped chain as a result of poor maintenance)
o On a 907ie check the left inner side of the swingarm. There's a conical spacer between swingarm and wheel. If this is or was mounted reversed you'll find deep marks in the swingarm (the correct position of the spacer is with its wider side towards the swingarm or it will lock the bearing!)
o On a 906 and 907ie check for leaks in the coolant system after the engine has reached its operating temperature. Possible reasons of a leak are a crack in the coolant expansion tank (mounted on the right side of the headlight) or a faulty filler cap
o On the 750: fine cracks in the oil cooler hoses are no concern unless there`s an oil leakage. These hoses are made of several plies
o When you test ride the bike look out for excessive vibration. Some vibration is normal on a 2 cylinder bike. If you feel a prickle in your hands or feet which becomes stronger the faster you go pull the clutch lever and let the bike roll. If that feeling is instantly gone the vibration is caused by the engine which in worst case could mean a crankshaft bearing starting to fail. If the vibration is still there this will indicate a misbalance in the suspension/wheels
o Furthermore look for a long stretch and accelerate hard through the gears. If the clutch is worn and slipping you'll notice an rpm increase without you getting that much faster
Note: A Paso sounds great specially if it comes with an aftermarket exhaust. All Ducatis do. Do not let the sound influence your buying decision !
You've bought the bike, what now ?
If the service record is up to date check tire pressure and oil level then go out and have fun.
If it isn't and you're the kind who only rides and handles everything else with the credit card, have the bike checked by a reputable shop.
If you're the diy kind of guy download all manuals, some magazine articles and read. Also search the forum before you post questions. About everything has already been discussed.
If you want to fully go through your bike here's a list of all the things you can check & do besides the things you've already looked at before buying the bike.
The very basic
o Get a duplicate of the keys if the bike only came with one
o Change all fluids: oil (incl. oil filter and wire-gauze filter), brake fluid incl. clutch, coolant on the 907ie (flush the coolant system if there are deposits)
o Replace spark plugs
o According to the official service manual change belts every 2 years no matter of actual milage (they may hold up longer, but that's your risk)
o Check valve clearances
o Replace air and fuel filter
o Check/replace brake discs and pads
o Check/replace tires (age overrules condition)
o Measure battery voltage and charge if necessary. If it's a regular battery check the acid level as well
o Verify correct chain tension and grease it (a rusty chain or one with stiff links needs to be replaced. More oil/grease won't fix that!)
o Check/replace sprockets
o Torque all bolts according to specification in the workshop manual. Applying anti seize will keep bolts from seizing.
A bit more detail
o Drain the fuel from the tank and look for rust or dirt inside (there`s a wire gauze filter in the fuel petcock which can be cleaned after the petcock was removed from the tank)
o Check the rubber boots of the intake manifolds (below the carb/injection system) for hairline cracks. If they have rotten dry replace them
o Check fuel lines for cracks
o Replace the rubber brake lines as they are over 20 years old. They may look ok on the outside but you can't see if they are internally dissolving (black brake fluid is a sign). One of the outcomes could be that the brake locks and doesn`t release when you hit it with the obvious consequences. (steel braided lines don't cost that much and it's a matter of safety after all)
o Go through the electrics and clean all contacts, specially all ground connections. Look for corroded, burnt or melted connectors & wires
o Measure over the battery if the voltage goes over 15V the more you open throttle. If it does you'll have to check the regulator/rectifier and eventually replace it (get an aftermarket unit as they are way better)
o Be sure the regulator/rectifier has a good ground connection
o Check speedometer, odometer and accelerator cables, remove, clean and lube them
o While you're at it check and replace broken silent blocks (vibration dampers) below the instrument panel. One reason they break is age, another can be a too short speedometer cable. An indicator for that is when there's tension on the rubber ring that holds the cable to the front fender also when the wheel is standing straight
o Check if the ignition key can be switched easily to each position (it can be rebuilt if it doesn't)
o Check if wheels spin free and if the bearings make any noises. There should be no side/axial play
o Verify that there's no play in the fork, swingarm or shock
o Measure if the clutch discs are still above minimum thickness
Going into full detail
o Clean the Weber carb (specially if the bike wasn't used for a long period as the fuel in the float chamber will dry and leave some sediments)
o If the fuel in the tank is years old drain it (you can still use it for cleaning parts) and fill up with fresh fuel. If there`s dirt in the tank flush it
o In case you remove the tank check it`s front mount for any cracks or leakage
o Rebuild the fork, flush it and replace oil, oil & dust seals (preferably with original or ARIETE), eventually bushings if necessary (same as on some BMW, check the forum). Have a close look at the stanchion tubes and look out for any surface damage or stickup (latter you can wash off or polish by hand)
o While the fork is out see if the steering moves freely and smooth. If it does grease the bearings, if it doesn't replace them. (and never reuse the old inner bearing race just because you're not able to get it from the steering stem!) It's a good time to take an even closer look at the steering stops, too.
o Remove the swingarm & linkage. Grease the swingarm axle, the needle bearing in the left swingarm boss and the ones in the linkage. These things are often not done
o If the headlight is dull clean the lens but don't touch the reflector !
o In case all light bulbs are still original and have started to become dark you may want to replace them. By dark I mean the glass of the bulbs
o Bikes with higher mileage or which have been ridden short distances have a higher wear on starter brushes so you may want to check their condition
o Remove the clutch cover and inspect the clutch basket and core for chatter marks
o Only on the 750 and early 906 (with the clutch slave piston in the clutch cover) look at the wear of the pressure plate center and the "T" (mushroom) pin that sits in the pistons bearing. See if the bearing runs smooth. If it doesn't you may have to replace the complete piston as it's difficult to remove from it (see FAQs). If there's brake fluid in the clutch cover you'll have to replace the seal/o-ring of the piston. Apply very little grease on the pin on the backside of the pressure plate just to make sure it moves smoothly and doesn't seize if the bike is stored.
o The speedometer drive of the 750 has a grease nipple so you can lube that
In case the bike was in long time storage there're some things one should do (before firing it up)
o When replacing the belts verify that there`s no rust on the belt rollers/tensioners. If so clean or better replace them as this will wear the belts
o Pull the cylinder heads and inspect the condition of the cylinder walls. The least is to squirt some oil through the spark plug hole and turn the engine over by hand a few times. Do a compression test
o On the 750 and 906 (with the clutch slave piston in the clutch cover) remove the clutch slave piston. Clean it and the cylinder in the cover to ensure the rubber o-ring didn't begin to stick to the cylinder wall
o For the same reason keep an eye on any oil leakage of the oil seals behind the cam pulleys and the driveshaft seal. You might even consider replacing them just as precaution. It's not a difficult job and the seals are not that expensive either.
The intervals of some of the points mentioned can be found in the workshop manual. What needs to be done depends on the bike's service history and condition.
The more you do at the beginning and the better you know the condition of your bike, the less surprises you'll have later on.
Of course you can also check if the cylinder head nuts are properly torqued or rebuild brake calipers or pumps ... But that's not necessary unless you want to do a full restoration or there are actual technical defects.
Room for improvement
When the bike is in its best possible condition there're still a few things you can do to make it better.
o The Weber (and any other) carb will benefit of a proper setup and individual jetting specially if there are parts on your bike that influence carburetion like open/sport exhaust or air filters, ported heads or whatnot
o A fuel pressure regulator (2-3psi) is a good add on in combination with the Weber carb or (even better) replace the electrical fuel pump with a vacuum fuel pump from a Ducati Monster or Yamaha TDM/TRX (no fuel pressure regulator will be needed then)
o Any engine benefits from a proper cam dialling (adjustable cam pulleys are helpful)
o Stronger/ new starter & battery cables will improve starting. There`s a ready kit you can buy (from Motolectric) but of course you can also make your own if you have the means or take your old cables to your local car stereo shop and have them make some
o On the 750 & 906: If the electrics is ok and the regulator/rectifier is checked for proper function, measure the voltage at the coils. If you measure a voltage drop adding a relay will be an improvement. It will also take stress from your ignition switch (https://app.box.com/s/waxvk1l9g47phfybd6n9)
o Aftermarket coils like the one from Dyna(tek) will further improve spark and in consequence idle behaviour and throttle response (coils and spark plug cables do age)
o In case you're using a standard battery get a battery acid overflow tank (it costs only a few $ and will protect your swingarm from acid spots)
o The headlight can be improved by adding a relay and/or replacing it with a Koyto unit or the dual headlight of a Yamaha FZ750 (which will require wiring mods). Do not throw in a 100W bulb as the excessive heat can cause damage to the reflector!
o Bar risers reduce the pressure on the wrists
o A washer under the clutch cover helps dissipating heat and blow out dust. Note that noise will increase and if you live in a humid climate clutch discs and springs can catch surface rust
o A cable tie through the hollow brake & clutch lever bolt will prevent it from ever coming loose and falling out
Tuning / modifying
A short & random list of other parts that can be fitted:
o Aftermarket exhaust systems are rare. Used ones can be found but there are only very few manufacturers which still manufacture some
o in case you have a US P750 you can replace the header with the larger size header from the european model. The output diameter of Euro cans is larger as well (the flange diameter is the same though so you can fit Euro cans on a US header or vice versa)
o Sport air filters (K&N, UNI Filter, BMC ...)
o Corbin seats
o Progressive fork springs & shock spring (Hyperpro, Wilbers ...) for a more responsive suspension
o Shocks (Wilbers, Hagon, Bitubo, Fox racing ...)
o Big bore kits or high compression pistons
o Ducati ST2 or 900SSie camshafts or aftermarket ones from VeeTwo, Kämna ...
o Programmable ignition modules (Ignitech, Silent Hektik, Pederzini ...)
o Aftermarket chips for the 907ie (FIM, FBF ...) - if you can get one
o A lighter flywheel makes the engine more responsive and feel more vivid
o Aftermarket carbon/aluminium belt or front sprocket covers for SS/Monster models (750 & early 906 will require the sprocket cover for early Supersports while almost any other sprocket cover for Ducatis with the clutch slave piston on the left engine side can be fitted on the 907ie)
o Larger rear sprockets (2 teeth more, hence a 40 tooth sprocket on the 750/906 or a 42 tooth sprocket on a 907ie will fit without having to replace the chain with a longer one)
o The "Ducati case saver" will protect the engine from damage caused by a snapping chain (will fit 900cc engines only)
o Keihin FCR 39/41, Mikuni TDMR 40 flatslide carbs for 750/906
o Open clutch covers for the 750/906 are hard to find. A 907ie can be fitted with any clutch cover for SS/Monster/851/888/916 etc.
o Aftermarket clutch slave cylinders can be fitted on the 907ie and late 906s (it should come with an adapter piston for all Ducatis pre 2000). These reduce clutch actuation effort
o Alternative brake calipers (you can fit almost any on a 750/906 as they will require a mounting adapter. For a 907ie it's the easiest to get some with a 40mm mounting hole distance)
o Brake or clutch master cylinders, radial or standard, no matter if Brembo or Nissin or aftermarket
o Adjustable brake & clutch levers
o Aftermarket/ adjustable foot pegs
o Scottoiler
o LED instrument panel conversion (see FAQs)
...
Last edited by paso750 on Thu Jun 06, 2013 20:25 am, edited 1 times in total.
750 Paso Technical FAQ Digest
-
jcslocum

- paso grand pooh-bah
- Posts: 1714
- Joined: Mon Jul 19, 2004 12:00 am
- model: 750 Paso
- year: 1988
- Location: Eastern Shore, MD
- Contact:
750 Paso Technical FAQ Digest
Last edited by jcslocum on Mon Oct 23, 2006 12:13 am, edited 7 times in total.
-
paso750
- paso grand pooh-bah
- Posts: 5574
- Joined: Sun Jul 18, 2004 12:00 am
- model: 750 Paso
- year: 1987
- Location: southern Germany
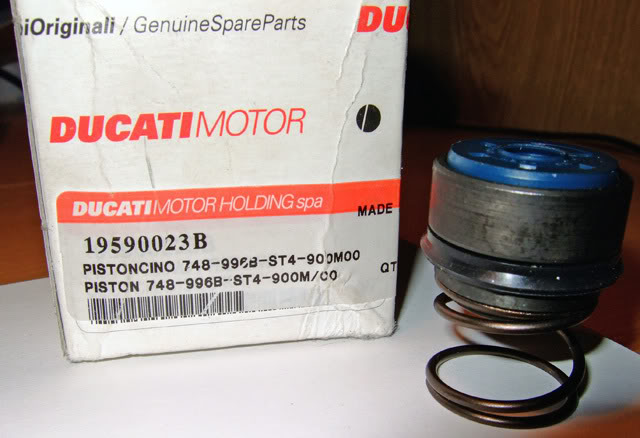
clutch slave piston replacement
Repairs to the clutch slave cylinder:
http://forums.ducatipaso.org/viewtopic.php?f=1&t=3947
The clutch slave cylinder is 26mm in diameter (precise the piston is 25.95mm and the bore of the cylinder is 26.00mm) and it has an o-ring/seal on the piston. (hence the o-ring groove is in the piston)
There are different clutch covers that look identical from the outside like the one of the 750F1. Inside it`s different though as the piston has 27,95mm diameter and the groove for the o-ring is not on the piston but in the cylinder. Interchangeability is only given if you switch the complete cover! There`s also a cover with a 31mm bore but don`t buy that one unless it comes including the piston. The 31mm piston is super rare and a cover w/o it is basically useless unless you have a machine shop make a matching piston.
According to the F1 parts catalogues there were three clutch slave pistons:
067516450 31mm diameter and no o-ring groove as that's in the cylinder
067016460 31mm diameter with o-ring groove
066516450 28mm no o-ring groove (Laguna Seca/same as on 85 Alazzurra 650)
If you have a piston with 2 bearings inside, where the upper bearing has loose bearing balls you have the one that was also used in some early 906s.
http://forums.ducatipaso.org/viewtopic. ... 530#p56530
This one can also be replaced by the alternative one mentioned below.
If you have problems with the clutch you may also want to remove the pressure plate and grease its pin on the rear side.
alternative clutch piston:
Ducati #19590023B (older part numbers were 195.2.002.1B and 195.2.002.3B)
It is the cheapest solution and requires the bearing and mushroom pin mentioned below.
This clutch piston is used on: Ducati Monster/ST2/ST4/Supersport/907IE/851/888/748/916/996
http://forums.ducatipaso.org/viewtopic.php?t=626
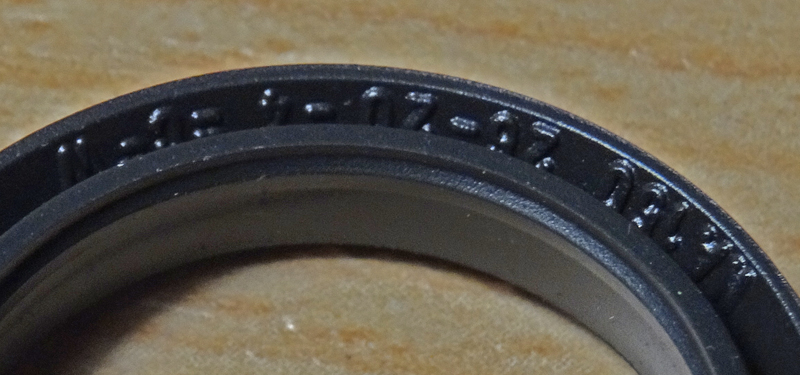
alternative clutch piston seal:
http://forums.ducatipaso.org/viewtopic.php?t=676
http://forums.ducatipaso.org/viewtopic.php?f=1&t=6943
or the one used on later Ducatis which is the V-type seal #93040091A. It's better than an o-ring and a direct replacement. (it can be seen in the picture above). You may get that in bearing or hydraulic shops. The type is NA150 26-20-4.
clutch slave cylinder bearing:
SKF 608-ZZ (same as -2Z, both means: both sides metal shielded)
commonly used also in inline skates, skateboards etc so sport equipment shops may have it, too.
8mm inner diameter
22mm outer diameter
7mm width
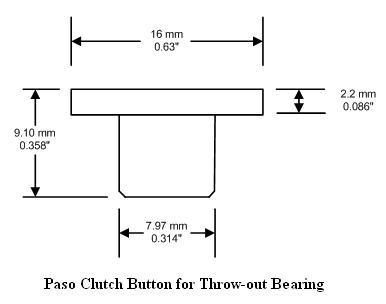
Clutch Button (Mushroom Pin) Dimensions
according to the parts catalogue there were 2 mushroom pins (#037016730 & #067016730) which difference was their material. #037016730 is made of bronze.
The other one could still be found i.e. at http://www.stein-dinse-shop.com/ .The order number is 067016730 and it did cost €4,25 according to the 2010/2011 catalogue. (Stein-Dinse is a german shop for Duc/Guzzi parts that has a few distributers in different countries. In US it`s http://www.mgcycle.com . In Australia it`s Stein-Dinse in Healesville, Vic., phone: 006135-9621366)
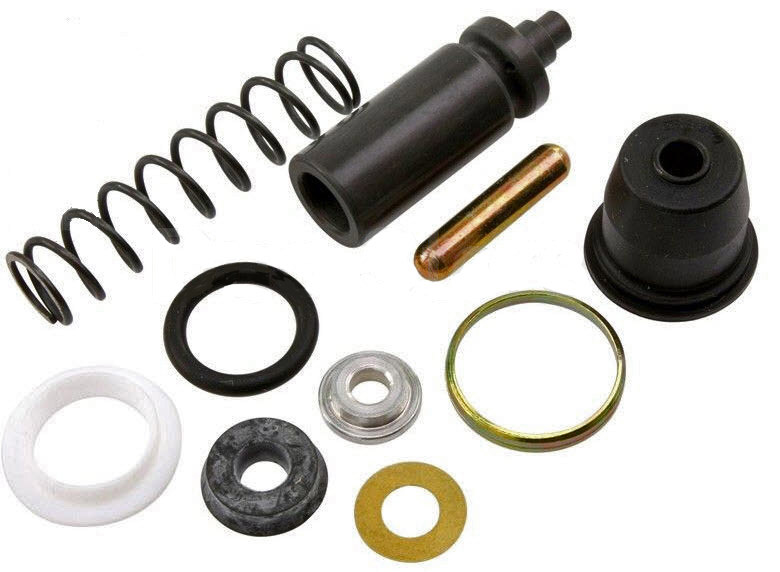
Clutch Master Rebuild
Clutch master cylinder failure is characterized by a relatively sudden loss of clutch stiffness. It can give little or no warning as to its impending failure.
The procedure to rebuild the master cylinder is relatively simple, and only requires a minimum of tools. A clean space to work and some patience is most important.
You will need Ducati part 000047226, which I obtained for approximately $25us. The dealer informed me that there is a price increase on the way which could raise it as high as $60us.
The procedure for this rebuild is outlined below
WARNING
Brake fluid can damage the paint on your Paso. Have a rag under your work area at all times!
1. Drain all fluid from the reservoir.
2. Remove banjo bolt from back of master cylinder that leads to clutch fluid tube.
3. Remove choke cable from choke lever.
4. Remove 2 allen bolts that retain master cylinder/lever assembly and withdraw the unit.
Gather up the following tools (shown from left to right) and find a clean place to work. You will also need a bottle of new brake fluid.
19mm wrench
medium phillips screwdriver
medium slotted screwdriver
very small slotted screwdriver
strong pick (like a dentist uses)
14mm socket
5. Using 19mm wrench, remove the lever retaining nut from the bottom of the assembly.
6. Push out the retaining pin and remove the lever from the assembly.
7. Spin the choke lever off it's mount, and remove the mount from the assembly.
8. Remove the pushrod from the dust seal in the now exposed end of the cylinder.
9. The seal will need to be picked out as much as possible to proceed. Be careful not to damage the inside of the cylinder.
10. After most or all of the seal has been removed, the piston and spring should drop free. Take note of which direction the spring faces in the assembly.
11. The seal and plastic bushing and o-ring are retained within the assembly with a press-in ring. There is a small hole in the side of the bore behind this ring, and with careful use of the small screwdriver, the ring can be distorted enough to remove easily. Also take note of which direction the plastic bushing faces.
12. Ensure that the o-ring is also out of the bore, and lay out the parts that you removed.
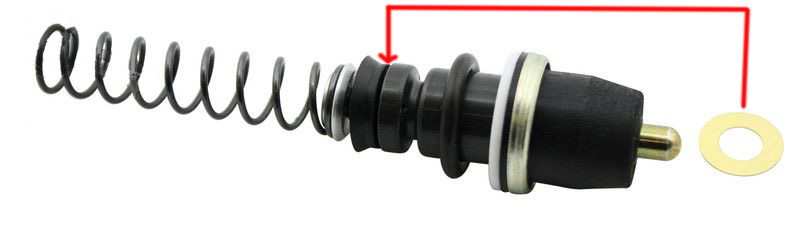
13. Lay out the new parts next to the old ones and make sure that they are all there. You will need to assemble the piston with the brass washer and seal, and the piston receiver will need to be inserted into the end of the spring.
14. Carefully flush out the bore with clean brake fluid.
15. Install the new o-ring in the groove.
16. Insert the spring, receiver side up.
17. Grease (read warning below!) the piston and CAREFULLY slide it seal first into the bore.
18. Now comes the tricky part. The piston must be compressed, while the plastic bushing, dust boot, and press-in ring are all installed. I found that the best way to do this was to slip the dust seal over the plastic bushing, followed by sliding the press-in ring over the dust boot. Now, slip your 14mm socket onto the phillips screwdriver, then CAREFULLY slide the screwdriver into the hole in the end of the dust seal. Holding this assembly together, use the end of the screwdriver to compress the piston, whereas the retention/dustboot assembly should drop neatly into place.
19. GENTLY tap (the wrench works nicely) on the socket to drive the retention ring home.
20. Remove the screwdriver and socket, and put the pushrod into place.
21. Re-install the pin and clutch lever.
22. Pour about 1/4" of new brake fluid into the reservoir, and gently prime the cylinder.
23. Re-install the choke mechanism.
24. Pour yourself a pint of Guinness, and marvel at your work!
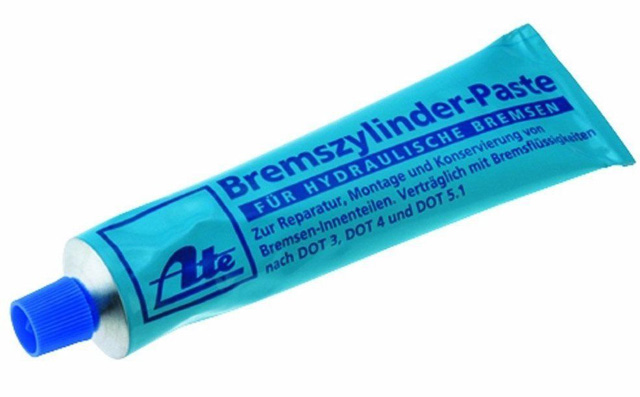
Warning: to install brake or clutch pistons or o-rings lube them with brake fluid or better use special brake cylinder paste (i.e. ATE 03990205012).
Never use oil (neither mineral or synthetic), copper grease, graphite grease, Plastilube, brake caliper grease or silicone grease. Most of these lubricants will cause rubber seals to swell. Not only will this make installation more difficult but it's only a matter of time until the rubber parts will fail. Some lubricants can react with brake fluid.
order of installation
Brake & Clutch Master Rebuild (incl. many pictures)
http://forums.ducatipaso.org/viewtopic. ... 133#p64133
P750 clutch disc order
http://forums.ducatipaso.org/viewtopic.php?f=1&t=3947
The clutch slave cylinder is 26mm in diameter (precise the piston is 25.95mm and the bore of the cylinder is 26.00mm) and it has an o-ring/seal on the piston. (hence the o-ring groove is in the piston)
There are different clutch covers that look identical from the outside like the one of the 750F1. Inside it`s different though as the piston has 27,95mm diameter and the groove for the o-ring is not on the piston but in the cylinder. Interchangeability is only given if you switch the complete cover! There`s also a cover with a 31mm bore but don`t buy that one unless it comes including the piston. The 31mm piston is super rare and a cover w/o it is basically useless unless you have a machine shop make a matching piston.
According to the F1 parts catalogues there were three clutch slave pistons:
067516450 31mm diameter and no o-ring groove as that's in the cylinder
067016460 31mm diameter with o-ring groove
066516450 28mm no o-ring groove (Laguna Seca/same as on 85 Alazzurra 650)
If you have a piston with 2 bearings inside, where the upper bearing has loose bearing balls you have the one that was also used in some early 906s.
http://forums.ducatipaso.org/viewtopic. ... 530#p56530
This one can also be replaced by the alternative one mentioned below.
If you have problems with the clutch you may also want to remove the pressure plate and grease its pin on the rear side.
alternative clutch piston:
Ducati #19590023B (older part numbers were 195.2.002.1B and 195.2.002.3B)
It is the cheapest solution and requires the bearing and mushroom pin mentioned below.
This clutch piston is used on: Ducati Monster/ST2/ST4/Supersport/907IE/851/888/748/916/996
http://forums.ducatipaso.org/viewtopic.php?t=626
alternative clutch piston seal:
http://forums.ducatipaso.org/viewtopic.php?t=676
http://forums.ducatipaso.org/viewtopic.php?f=1&t=6943
or the one used on later Ducatis which is the V-type seal #93040091A. It's better than an o-ring and a direct replacement. (it can be seen in the picture above). You may get that in bearing or hydraulic shops. The type is NA150 26-20-4.
clutch slave cylinder bearing:
SKF 608-ZZ (same as -2Z, both means: both sides metal shielded)
commonly used also in inline skates, skateboards etc so sport equipment shops may have it, too.
8mm inner diameter
22mm outer diameter
7mm width
Clutch Button (Mushroom Pin) Dimensions
according to the parts catalogue there were 2 mushroom pins (#037016730 & #067016730) which difference was their material. #037016730 is made of bronze.
The other one could still be found i.e. at http://www.stein-dinse-shop.com/ .The order number is 067016730 and it did cost €4,25 according to the 2010/2011 catalogue. (Stein-Dinse is a german shop for Duc/Guzzi parts that has a few distributers in different countries. In US it`s http://www.mgcycle.com . In Australia it`s Stein-Dinse in Healesville, Vic., phone: 006135-9621366)
Clutch Master Rebuild
Clutch master cylinder failure is characterized by a relatively sudden loss of clutch stiffness. It can give little or no warning as to its impending failure.
The procedure to rebuild the master cylinder is relatively simple, and only requires a minimum of tools. A clean space to work and some patience is most important.
You will need Ducati part 000047226, which I obtained for approximately $25us. The dealer informed me that there is a price increase on the way which could raise it as high as $60us.
The procedure for this rebuild is outlined below
WARNING
Brake fluid can damage the paint on your Paso. Have a rag under your work area at all times!
1. Drain all fluid from the reservoir.
2. Remove banjo bolt from back of master cylinder that leads to clutch fluid tube.
3. Remove choke cable from choke lever.
4. Remove 2 allen bolts that retain master cylinder/lever assembly and withdraw the unit.
Gather up the following tools (shown from left to right) and find a clean place to work. You will also need a bottle of new brake fluid.
19mm wrench
medium phillips screwdriver
medium slotted screwdriver
very small slotted screwdriver
strong pick (like a dentist uses)
14mm socket
5. Using 19mm wrench, remove the lever retaining nut from the bottom of the assembly.
6. Push out the retaining pin and remove the lever from the assembly.
7. Spin the choke lever off it's mount, and remove the mount from the assembly.
8. Remove the pushrod from the dust seal in the now exposed end of the cylinder.
9. The seal will need to be picked out as much as possible to proceed. Be careful not to damage the inside of the cylinder.
10. After most or all of the seal has been removed, the piston and spring should drop free. Take note of which direction the spring faces in the assembly.
11. The seal and plastic bushing and o-ring are retained within the assembly with a press-in ring. There is a small hole in the side of the bore behind this ring, and with careful use of the small screwdriver, the ring can be distorted enough to remove easily. Also take note of which direction the plastic bushing faces.
12. Ensure that the o-ring is also out of the bore, and lay out the parts that you removed.
13. Lay out the new parts next to the old ones and make sure that they are all there. You will need to assemble the piston with the brass washer and seal, and the piston receiver will need to be inserted into the end of the spring.
14. Carefully flush out the bore with clean brake fluid.
15. Install the new o-ring in the groove.
16. Insert the spring, receiver side up.
17. Grease (read warning below!) the piston and CAREFULLY slide it seal first into the bore.
18. Now comes the tricky part. The piston must be compressed, while the plastic bushing, dust boot, and press-in ring are all installed. I found that the best way to do this was to slip the dust seal over the plastic bushing, followed by sliding the press-in ring over the dust boot. Now, slip your 14mm socket onto the phillips screwdriver, then CAREFULLY slide the screwdriver into the hole in the end of the dust seal. Holding this assembly together, use the end of the screwdriver to compress the piston, whereas the retention/dustboot assembly should drop neatly into place.
19. GENTLY tap (the wrench works nicely) on the socket to drive the retention ring home.
20. Remove the screwdriver and socket, and put the pushrod into place.
21. Re-install the pin and clutch lever.
22. Pour about 1/4" of new brake fluid into the reservoir, and gently prime the cylinder.
23. Re-install the choke mechanism.
24. Pour yourself a pint of Guinness, and marvel at your work!
Warning: to install brake or clutch pistons or o-rings lube them with brake fluid or better use special brake cylinder paste (i.e. ATE 03990205012).
Never use oil (neither mineral or synthetic), copper grease, graphite grease, Plastilube, brake caliper grease or silicone grease. Most of these lubricants will cause rubber seals to swell. Not only will this make installation more difficult but it's only a matter of time until the rubber parts will fail. Some lubricants can react with brake fluid.
order of installation
Brake & Clutch Master Rebuild (incl. many pictures)
http://forums.ducatipaso.org/viewtopic. ... 133#p64133
P750 clutch disc order
- Attachments
-
- 19020022a Kopie.jpg
- (249.28 KiB) Downloaded 978 times
Last edited by paso750 on Thu Apr 05, 2007 8:00 pm, edited 1 time in total.
-
jcslocum
- paso grand pooh-bah
- Posts: 1714
- Joined: Mon Jul 19, 2004 12:00 am
- model: 750 Paso
- year: 1988
- Location: Eastern Shore, MD
- Contact:
Dellorto Carb Sync
Paso 750 Wiring Upgrade This thread contains information about making changes to your Paso wiring sytem that will improve starting.
wiring mod as pdf: https://app.box.com/s/waxvk1l9g47phfybd6n9
*******
Starter Sprag Repair:
http://forums.ducatipaso.org/viewtopic.php?t=651
This thread is about the starter sprag and how to make repairs.
More Info: http://tinyurl.com/yz8dox
http://tinyurl.com/2e659h
When looking at the left engine side (alternator cover removed) the starter sprag clutch locks when rotating the flywheel counterclockwise. (the same rotating direction of the starter motor)
When replacing it and inserting the new unit in the flywheel of course it has to lock clockwise as you`re looking at its backside.
Dellorto Carbs:
Skins Ducati Cuddle:
http://forums.ducatipaso.org/viewtopic.php?f=1&t=95
************
Dellorto tuning:
http://forums.ducatipaso.org/viewtopic.php?f=1&t=448
Last edited by jcslocum on Tue Oct 25, 2005 11:45 am, edited 2 times in total.
-
jcslocum
- paso grand pooh-bah
- Posts: 1714
- Joined: Mon Jul 19, 2004 12:00 am
- model: 750 Paso
- year: 1988
- Location: Eastern Shore, MD
- Contact:
Clutch Plates
Clutch Plate Sequence:
http://forums.ducatipaso.org/viewtopic.php?t=490
http://forums.ducatipaso.org/viewtopic.php?t=412
Clutch Plate Pack order number:
190 200 22A (formerly 190 200 21A) or Surflex S2076 (or Surflex S1686 for the sintered clutch pack)
same for : 500 Pantah, 750 F1 -´88 (2.series), Montjuich ´86-´87, Laguna Seca ´87, 750 Sport ´88-´90, 750 SS ´91-´92, 900 SS ´89 -´90, 906 Paso ´89-´90, 750 Paso ´86-´89, 851 SB ´88, 888 Racing ´89
ADIGE clutch kits:
Please note these refer only to the friction pack. For the complete sets the best is to check the catalogue and find out the complete set code# against the friction pack code#.
According to their catalogue the dry clutch kits available are:
DU-45 (Elefant 650, Indiana, F3 , F1 Laguna Seca & Santa Monica)
DU-83 (Elefant 350, 750 Dakar, Explorer, Bifaro, 900)
DU-79 (Sport, Junior, Paso 750 & 906)
DU-56 (all/most of "dry clutch" Ducati from '91 onwards including the Tamburini* series)
DU-74 (851 & 888 and all Tamburini SP, SPS, R)
according to ADIGE:
DU-45 = organic friction Kit discs only (6disc+1 "tornito"** ) Steel disc support
DU-83 = organic friction Kit discs only (7disc+1 "tornito"** ) Steel disc support
DU-79 = same as DU-45
DU-56 = organic friction Kit discs only (7discs) Steel disc support
DU-74 - Syntered friction Kit discs only (8 disc) steel disc support.
*Tamburini = 748-916-996-998 in Strada & S versions
** Tornito = literally means machined on the lathe; I checked a couple of pictures on the web and it seems that these kits have 1 disc which is plain (no friction material)
The complete clutch kit (friction + steel discs) is: DU-81
Last edited by jcslocum on Wed Nov 02, 2005 12:58 pm, edited 2 times in total.
-
jcslocum
- paso grand pooh-bah
- Posts: 1714
- Joined: Mon Jul 19, 2004 12:00 am
- model: 750 Paso
- year: 1988
- Location: Eastern Shore, MD
- Contact:
17" Wheel Conversion
17 inch Wheel Conversion Info:
http://forums.ducatipaso.org/viewtopic.php?t=386
More info: Tire Changes
http://forums.ducatipaso.org/viewtopic.php?t=1455
17" wheel conversion info for 750 Sport
http://forums.ducatipaso.org/viewtopic.php?f=13&t=2698
http://forums.ducatipaso.org/viewtopic.php?t=386
More info: Tire Changes
http://forums.ducatipaso.org/viewtopic.php?t=1455
17" wheel conversion info for 750 Sport
http://forums.ducatipaso.org/viewtopic.php?f=13&t=2698
Last edited by jcslocum on Tue Nov 14, 2006 8:27 pm, edited 3 times in total.
-
jcslocum
- paso grand pooh-bah
- Posts: 1714
- Joined: Mon Jul 19, 2004 12:00 am
- model: 750 Paso
- year: 1988
- Location: Eastern Shore, MD
- Contact:
Weber Carb Info:
http://forums.ducatipaso.org/viewtopic.php?t=472
http://forums.ducatipaso.org/viewtopic.php?t=167
http://forums.ducatipaso.org/viewtopic.php?t=747
Whats wrong with your weber? Can pull more horses easily from that carb at a fraction of the cost!! They are so restricted its not funny[air flow wise] Due to european air emission regs. We have a magician on webers in nz. Murray @weberspecialties in the big A/land .Full range of kits & jets readilly available. e-mail weberspx@ihug.co.nz
or ph 094435638. He drilled the accelerator pump jet [40thou stock] to60 thou on my carb . Man what a differance!!!
Last edited by jcslocum on Sun Oct 22, 2006 12:47 pm, edited 2 times in total.
-
Skins
- paso grand pooh-bah
- Posts: 1304
- Joined: Tue Oct 26, 2004 12:00 am
- model: 750 Paso
- year: 1988
- Location: Kapiti, New Zealand
Keys
Hello all, just thought i would comment on this topic after sourcing new blanks for an existing key (the rounded ignition type and the seat lock). I had great feedback and help from a company in Australia http://www.keys4classics.com , who identified the key as their key blank number #253
well here's a copy of my invoice for 2 ignition blanks and 2 seat lock key blanks.
2 of #253 GT5BP @ 4.95
2 of #325 MER1@ 3.50
Shipping 2.95
TOTAL US$19.85
-------------------------------------------------------------------------------------
Got some ignition keys cut locally.
Locksmith used a Fiat blank. Apparently there is a left handed and right handed blank.
Key blank is Silca marked GT GR
2 keys cut for £8.50 Sterling
*******************************************************************
Just a note on Paso keys - In San Francisco, on Haight street, there is a hardware store that I purchased BOTH my ignition and seat lock keys at for less than $5. I'm sure you can order the blanks from them or stop in and have a set cut.
Roberts Hardware
http://www.robertshardware.com
1629 Haight St
San Francisco, CA 94117-2815
(415) 431-3392
-
paso750
- paso grand pooh-bah
- Posts: 5574
- Joined: Sun Jul 18, 2004 12:00 am
- model: 750 Paso
- year: 1987
- Location: southern Germany
Parts interchange
http://forums.ducatipaso.org/viewtopic.php?f=1&t=2152
Airbox clips
http://forums.ducatipaso.org/viewtopic. ... 499#p33499
http://forums.ducatipaso.org/viewtopic.php?f=1&t=2152
Airbox clips
http://forums.ducatipaso.org/viewtopic. ... 499#p33499
-
paso750
- paso grand pooh-bah
- Posts: 5574
- Joined: Sun Jul 18, 2004 12:00 am
- model: 750 Paso
- year: 1987
- Location: southern Germany
more Mikuni conversion
Mikuni conversion
Take the carburettor from a (600)/750/900 Supersport/Monster. They are all the same but with different jetting. If you have a P750/Sport take the carb manifolds of a 750 SS/Monster (not of a 600 as those have a smaller inner diameter). For a 906 take the ones of a 900cc Duc. Their length is minimally different as is their angle (as the cylinders are higher) although they look identical. (Don't listen to anyone who says they are all the same. Some carb manifolds have a 6, 7 or 9 stamped on their flange identifying them as for a 600, 750 or 900 Duc). When mounting the carb manifolds try to swap the vertical and horizontal one if they stand in a different angle.
incorrect
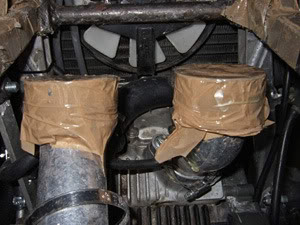
correctly swapped
Furthermore you need the 2 throttle cables & accelerator throttle from a Supersport/Monster, the 2 rubber boots to fit the carb on the carb manifolds, 4 hose clamps, the gaskets below the carb manifolds, two breather canisters, the breather tubes incl. valves and some air filters. You can still use your old choke lever/mechanism but it will need the cable from a SS (or another with a nipple on both ends).
The Mikuni from a Yamaha TDM/TRX can be fitted as well but it is a little different. It has a throttle position sensor (which can be ignored) and is mounted reversed on the Yamahas. So when this carb is put on a Duc the throttle cable connection is on the rear. As a consequence longer throttle cables are needed and the installation is a little more difficult. As the throttle cables from a TRX/TDM don`t combine with the accelerator throttle from a Ducati you will need the complete throttle cables and accelerator throttle from a Yamaha as well. The bent tubes for the breather hose connections show downwards and to the rear on a Duc Mikuni but slightly upwards on a Yamaha Mikuni. These will be in the way if you plan to make an airbox instead of using pod filters. A Mikuni from a Duc is the easier fit.
The advantage of the Yamaha Mikuni is that chances are you find one cheaper and it has a remote idle adjuster as well.
The steps:
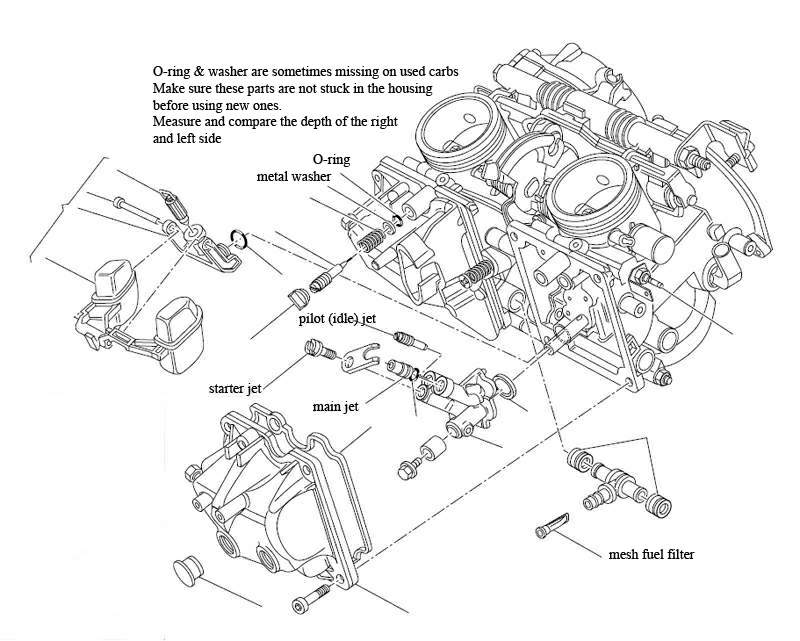
What you will need is a spray-can of carb-cleaner. Be sure to have the correct size Phillips screw driver at hand or you will ruin the screw heads! (specially the ones of the float chamber cover). It's highly recommended to remove and note all jet sizes of the carb as you never know if it's being fiddled with in the past. Compare that to the jettings shown on the bottom. You'll need this info as a starting point for an eventual rejetting.
1, Clean the carb. If you don't want to remove the jets spray some carb cleaner in them.
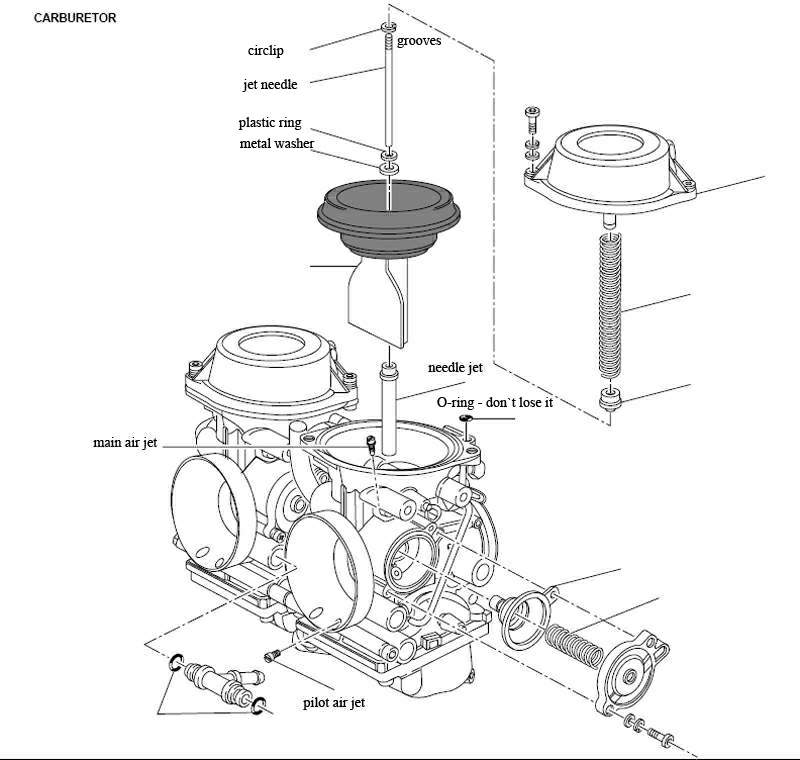
Remove the round cover holding the carb with this side upwards, because on the bottom under the cover there is a very little O-ring, which gets lost very easily. After this gently remove the membrane, the needle and the slider. Clean the slider and needle with a soft cloth and some carb-cleaner and also the plastic part inside the carb where the slider moves in. The slider should move effortlessly.
Do not (!!!) get any carb-cleaner or other solvent on the rubber membrane. It will lose shape and will be very hard to place when reassembling. (if that happened do not dry the membrane by placing it near a heater). If a membrane has a hole in it, it has to be replaced. Replace also if dry and stiff).
On the left above the opening for the slider there`s a very small jet. That's the air jet.
2, Remove the square cover of the float chamber then. Clean it inside. After longer storage of the bike there will be some deposits from dried fuel.
The screws of the cover are often dry and seized so it's crucial you use the correct size Phillips screw driver or you will ruin the screw heads. In case the old screws don`t turn try to tap the Phillips screw driver with a hammer. If you do ruin them or they already are, replace them with allen screws. (Applying a little bit of anti seize paste will help in future)
The big slotted jet is the starter jet which holds the main jet in place. Deep in the hole next to these two is the idle jet.
If you remove the hex screw you can pull off the whole part with the jets and push out the needle valve which including the white plastic part will come out on the opposite side.
3, In case you fully want to disassemble the Mikunis (which is easy) be careful when removing the plastic actuators of the choke assembly. These are held by 2 clips that have to be pressed together while carefully pulling the actuators out. If you're unsure leave them alone as it's possible one of the plastic retaining clips breaks off. In case you do remove them note which way round they are mounted (there`s a small metal shield on one side of the needle)
4, On the bottom middle of the float chambers are the pilot screws (idle adjustment). It's possible these are sealed. If so very carefully (!) drill out the plug with a 5/32 (3,5-4mm) drill so you can adjust them. If the adjuster screws were not sealed remove them to check if the washer and o-ring are there. (the order from inside to out is rubber o-ring, washer, spring, adjuster screw). Note the o-ring and washer are extremely small so work on a clean table, preferably put a towel on it as parts falling down won`t bounce from the table as they would from a hard surface.
For a basic set up turn the screws in clockwise until lightly (!!!) seated, then back out 2,5 or 3 turns. Turning the screw clockwise (in) will reduce the added air/fuel mixture, counterclockwise (out) will add more.
Making a small indication mark when the screws are fully in may help when counting turns.
To keep the adjuster screws from seizing find two matching plastic caps or a rubber tube that fits over the ducts. In case of a rubber tube heat one end until it starts to melt and squash with flat pliers.
5, Do not oil the choke slider on the back part of the carb as this will attract dust & dirt. Try to keep it clean same as the throttle rocker.
6, The 2-cable accelerator throttle is a must. Do not use a one cable unit, the closer cable is there for a reason. Btw there should be only little "play" in the accelerator throttle (ca. 3mm).
7, Between the accelerator throttle and the rubber grip there's a plastic washer to prevent the rubber grip to touch the accelerator throttle housing.
8, Oil the throttle cables before assembling everything. It will be hard afterwards.
The throttle cables lead trough the triangle (front-frame) to the carb. The upper cable of the accelerator throttle connects to the lower of the throttle rocker of the carb (throttle opener).
9, Check how well the paper gaskets match the carb manifold and cylinder head port diameter. If you don`t have original gaskets get or make some. Oil the gaskets when mounting them
10, Small air filters are no good. Prefer higher ones if possible. I.e. UNI filter UP4060A (10cm height), better UNI filter UP6060A (15cm) or K&N SN-2530
11, When connecting the choke cable be sure it still has a little slack when the choke lever is in OFF position
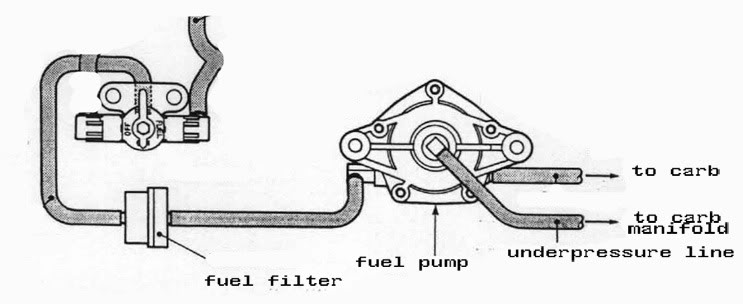
12, the fuel-lines: if you have an aftermarket fuel-pressure regulator remove it (it's not required). On the Mikuni there are 2 (movable) "T" pieces. The front (lower) one with a small filter inside is the fuel inlet coming from the fuel-pump. In this fuel-line (before the carb) there must be a "Y" piece leading excessive fuel back to the tank (rear connection pipe of the tank, the one before it is the tank breather). It must be there or the carb could flood. (and give Weber-like symptoms). If there`s a restrictor jet in the Y piece or return line remove it.
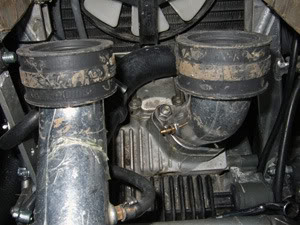
The rear (higher) "T" is an output which leads to a little fuel resistant plastic canister attached to the frame (left side).
Each carb body has a downwards bend tube on the right upper side. This is the connection for the breather hose with the small black filters. These hoses lead to a plastic canister (attached to frame - right side). The only reason for these canisters is that the breather and overflow hoses end in a windless environment. The breather connection allows the diaphragm to move. Air is sucked in and pushed out depending on the movement of the diaphragm. To hinder dust to enter you need those black inline filters and to not influence the movement of the membrane by underpressure on the breather connection the breather hose leads to the small canister.
When it comes to which canisters you use, you can either improvise with some small plastic bottles, take the larger triangle shaped ones from a Supersport or the smaller, flat ones from a Monster.
The latter are easier to find a place for. (If you mount them on a frame rail, place them on the frame and mark inner and outer edge of the frame rail on the canister. Then drill 4 holes in the canister to fit them to the frame with cable ties. Use long cable ties and bend them before trying to fiddle them through the holes. Put some textile tape on the frame where the cable ties will be to prevent any rubbing).
On the front (lower part float chamber) there are two outputs. The one next to a screw is the float chamber drain. This usually connects to a thin tube that leads down the frame towards the ground.

13, The Mikuni will work with the electric fuel pump but imo the underpressure fuel pump as used on the Monster or TDM/TRX is the better match
http://forums.ducatipaso.org/viewtopic.php?f=2&t=6800
14, Don`t forget to block the hose nipples on the carb manifolds which are not used. Replace them by a screw and gasket. If you have a 906 don`t forget to connect the vacuum tube for the ignition advance that connects to the Marelli Digiplex.
Depending of the model the carb manifolds came from there may be no screw nipples, not even holes for them. In that case you have to drill the holes and cut the threads by yourself. (the original hose nipples have a M5 thread) Hose can be found at Ducati, http://www.motionpro.com or in shops for model making (radio controlled cars/ planes) or hydraulics
15, When you fire up the engine the first time you may need carb-cleaner/ starting aid spray. Use only a little as it washes the oil from the cylinder walls, too. Try starting w/o using choke and with the air filters mounted. Don`t let the engine turn over endlessly. If it doesn`t fire up wait a while and try again, after all the fuel needs to get pumped to the carb and the air needs to get out of the system.
You`re also likely to flood the engine at the first start up so go slow.
The engine may run bad the first time. Let it run a bit and see if it gets better when the engine gets warmer. Adjust idle and balance the carb. Later on correct the jetting as necessary (the stock SS/Monster jetting will probably not match perfectly with pod filters and maybe even an aftermarket exhaust)
If you let the engine run in the garage open all doors ! A fan placed in front of the bike may help preventing it to overheat.
16, Use clean spark plugs. Champions seem to work better than others (RA6HC for the 750, RA8HC for the 906). Gap = 0,6 mm
17, In case you'll use a modified air box you can fit a K&N DU-0900 air filter
18, You can use a Dynojet stage 1 or 2 kit from Micron (for SS or Monster) to improve performance. Specially recommended if using an aftermarket exhaust system.
This should work better than the original SS setup, but still it's highly recommended to dynorun the bike after the conversion and have the carb adjusted and jetted individually specially if you`re using pod filters and an aftermarket exhaust. (Don`t expect the bike to run perfect with the original SS jetting and that - much leaner - setup).
I didn't do this as the bike ran fine with the Dynojet kit (using a custom airbox, not pod filters), but that doesn't mean it could've worked even better.
Do check this thread: http://forums.ducatipaso.org/viewtopic.php?f=2&t=6403
The original jetting of the 750SS is:
main jet: 140
main air jet: 70
needle jet: Y-6
Jet needle: 5C19 - 3rd notch from top
Pilot jet: 37,5
Pilot air jet: 60/1.4
The original jetting of the 900SS is:
main jet: 140
main air jet: 70
needle jet: Y-2
Jet needle: 5C19 - 4th notch from top
Pilot jet: 42,5
Pilot air jet: 60/1.4
A Y-2 needle jet is leaner than a Y-6.
The later in the alphabet the larger the diameter of the needle jet.
From one letter to the next (with the same number; i.e. Q-2 to R-2) is 0,05mm difference.
From one number to the next (with the same letter; i.e. R2 to R3) is 0,005mm difference.
Hence the Y-2 is 3,11mm diameter, the Y-6 is 3,130mm.
Mikuni jets have this symbol stamped on them.
Dynojet jets have YJ and a number stamped on them instead. A Mikuni 140 main jet is not the same as a Dynojet YJ140. There are conversion tables you`ll find in the internet.
Some Mikunis have a flat float chamber cover. Others have 2 holes in the cover. These holes (which are only a bypass) are for the carb heating system. It's not important if there is a rubber plug in the holes or not, because the holes don't really go "inside" the carb and no, you won't be able to use this heating system (unluckily) because the SS/Monster oil-lines are much thinner than the ones of the Paso.
Mikuni manuals:
https://app.box.com/s/gslivfnzo4d3ak79cqs1
Take the carburettor from a (600)/750/900 Supersport/Monster. They are all the same but with different jetting. If you have a P750/Sport take the carb manifolds of a 750 SS/Monster (not of a 600 as those have a smaller inner diameter). For a 906 take the ones of a 900cc Duc. Their length is minimally different as is their angle (as the cylinders are higher) although they look identical. (Don't listen to anyone who says they are all the same. Some carb manifolds have a 6, 7 or 9 stamped on their flange identifying them as for a 600, 750 or 900 Duc). When mounting the carb manifolds try to swap the vertical and horizontal one if they stand in a different angle.
incorrect
correctly swapped
Furthermore you need the 2 throttle cables & accelerator throttle from a Supersport/Monster, the 2 rubber boots to fit the carb on the carb manifolds, 4 hose clamps, the gaskets below the carb manifolds, two breather canisters, the breather tubes incl. valves and some air filters. You can still use your old choke lever/mechanism but it will need the cable from a SS (or another with a nipple on both ends).
The Mikuni from a Yamaha TDM/TRX can be fitted as well but it is a little different. It has a throttle position sensor (which can be ignored) and is mounted reversed on the Yamahas. So when this carb is put on a Duc the throttle cable connection is on the rear. As a consequence longer throttle cables are needed and the installation is a little more difficult. As the throttle cables from a TRX/TDM don`t combine with the accelerator throttle from a Ducati you will need the complete throttle cables and accelerator throttle from a Yamaha as well. The bent tubes for the breather hose connections show downwards and to the rear on a Duc Mikuni but slightly upwards on a Yamaha Mikuni. These will be in the way if you plan to make an airbox instead of using pod filters. A Mikuni from a Duc is the easier fit.
The advantage of the Yamaha Mikuni is that chances are you find one cheaper and it has a remote idle adjuster as well.
The steps:
What you will need is a spray-can of carb-cleaner. Be sure to have the correct size Phillips screw driver at hand or you will ruin the screw heads! (specially the ones of the float chamber cover). It's highly recommended to remove and note all jet sizes of the carb as you never know if it's being fiddled with in the past. Compare that to the jettings shown on the bottom. You'll need this info as a starting point for an eventual rejetting.
1, Clean the carb. If you don't want to remove the jets spray some carb cleaner in them.
Remove the round cover holding the carb with this side upwards, because on the bottom under the cover there is a very little O-ring, which gets lost very easily. After this gently remove the membrane, the needle and the slider. Clean the slider and needle with a soft cloth and some carb-cleaner and also the plastic part inside the carb where the slider moves in. The slider should move effortlessly.
Do not (!!!) get any carb-cleaner or other solvent on the rubber membrane. It will lose shape and will be very hard to place when reassembling. (if that happened do not dry the membrane by placing it near a heater). If a membrane has a hole in it, it has to be replaced. Replace also if dry and stiff).
On the left above the opening for the slider there`s a very small jet. That's the air jet.
2, Remove the square cover of the float chamber then. Clean it inside. After longer storage of the bike there will be some deposits from dried fuel.
The screws of the cover are often dry and seized so it's crucial you use the correct size Phillips screw driver or you will ruin the screw heads. In case the old screws don`t turn try to tap the Phillips screw driver with a hammer. If you do ruin them or they already are, replace them with allen screws. (Applying a little bit of anti seize paste will help in future)
The big slotted jet is the starter jet which holds the main jet in place. Deep in the hole next to these two is the idle jet.
If you remove the hex screw you can pull off the whole part with the jets and push out the needle valve which including the white plastic part will come out on the opposite side.
3, In case you fully want to disassemble the Mikunis (which is easy) be careful when removing the plastic actuators of the choke assembly. These are held by 2 clips that have to be pressed together while carefully pulling the actuators out. If you're unsure leave them alone as it's possible one of the plastic retaining clips breaks off. In case you do remove them note which way round they are mounted (there`s a small metal shield on one side of the needle)
4, On the bottom middle of the float chambers are the pilot screws (idle adjustment). It's possible these are sealed. If so very carefully (!) drill out the plug with a 5/32 (3,5-4mm) drill so you can adjust them. If the adjuster screws were not sealed remove them to check if the washer and o-ring are there. (the order from inside to out is rubber o-ring, washer, spring, adjuster screw). Note the o-ring and washer are extremely small so work on a clean table, preferably put a towel on it as parts falling down won`t bounce from the table as they would from a hard surface.
For a basic set up turn the screws in clockwise until lightly (!!!) seated, then back out 2,5 or 3 turns. Turning the screw clockwise (in) will reduce the added air/fuel mixture, counterclockwise (out) will add more.
Making a small indication mark when the screws are fully in may help when counting turns.
To keep the adjuster screws from seizing find two matching plastic caps or a rubber tube that fits over the ducts. In case of a rubber tube heat one end until it starts to melt and squash with flat pliers.
5, Do not oil the choke slider on the back part of the carb as this will attract dust & dirt. Try to keep it clean same as the throttle rocker.
6, The 2-cable accelerator throttle is a must. Do not use a one cable unit, the closer cable is there for a reason. Btw there should be only little "play" in the accelerator throttle (ca. 3mm).
7, Between the accelerator throttle and the rubber grip there's a plastic washer to prevent the rubber grip to touch the accelerator throttle housing.
8, Oil the throttle cables before assembling everything. It will be hard afterwards.
The throttle cables lead trough the triangle (front-frame) to the carb. The upper cable of the accelerator throttle connects to the lower of the throttle rocker of the carb (throttle opener).
9, Check how well the paper gaskets match the carb manifold and cylinder head port diameter. If you don`t have original gaskets get or make some. Oil the gaskets when mounting them
10, Small air filters are no good. Prefer higher ones if possible. I.e. UNI filter UP4060A (10cm height), better UNI filter UP6060A (15cm) or K&N SN-2530
11, When connecting the choke cable be sure it still has a little slack when the choke lever is in OFF position
12, the fuel-lines: if you have an aftermarket fuel-pressure regulator remove it (it's not required). On the Mikuni there are 2 (movable) "T" pieces. The front (lower) one with a small filter inside is the fuel inlet coming from the fuel-pump. In this fuel-line (before the carb) there must be a "Y" piece leading excessive fuel back to the tank (rear connection pipe of the tank, the one before it is the tank breather). It must be there or the carb could flood. (and give Weber-like symptoms). If there`s a restrictor jet in the Y piece or return line remove it.
The rear (higher) "T" is an output which leads to a little fuel resistant plastic canister attached to the frame (left side).
Each carb body has a downwards bend tube on the right upper side. This is the connection for the breather hose with the small black filters. These hoses lead to a plastic canister (attached to frame - right side). The only reason for these canisters is that the breather and overflow hoses end in a windless environment. The breather connection allows the diaphragm to move. Air is sucked in and pushed out depending on the movement of the diaphragm. To hinder dust to enter you need those black inline filters and to not influence the movement of the membrane by underpressure on the breather connection the breather hose leads to the small canister.
When it comes to which canisters you use, you can either improvise with some small plastic bottles, take the larger triangle shaped ones from a Supersport or the smaller, flat ones from a Monster.
The latter are easier to find a place for. (If you mount them on a frame rail, place them on the frame and mark inner and outer edge of the frame rail on the canister. Then drill 4 holes in the canister to fit them to the frame with cable ties. Use long cable ties and bend them before trying to fiddle them through the holes. Put some textile tape on the frame where the cable ties will be to prevent any rubbing).
On the front (lower part float chamber) there are two outputs. The one next to a screw is the float chamber drain. This usually connects to a thin tube that leads down the frame towards the ground.
13, The Mikuni will work with the electric fuel pump but imo the underpressure fuel pump as used on the Monster or TDM/TRX is the better match
http://forums.ducatipaso.org/viewtopic.php?f=2&t=6800
14, Don`t forget to block the hose nipples on the carb manifolds which are not used. Replace them by a screw and gasket. If you have a 906 don`t forget to connect the vacuum tube for the ignition advance that connects to the Marelli Digiplex.
Depending of the model the carb manifolds came from there may be no screw nipples, not even holes for them. In that case you have to drill the holes and cut the threads by yourself. (the original hose nipples have a M5 thread) Hose can be found at Ducati, http://www.motionpro.com or in shops for model making (radio controlled cars/ planes) or hydraulics
15, When you fire up the engine the first time you may need carb-cleaner/ starting aid spray. Use only a little as it washes the oil from the cylinder walls, too. Try starting w/o using choke and with the air filters mounted. Don`t let the engine turn over endlessly. If it doesn`t fire up wait a while and try again, after all the fuel needs to get pumped to the carb and the air needs to get out of the system.
You`re also likely to flood the engine at the first start up so go slow.
The engine may run bad the first time. Let it run a bit and see if it gets better when the engine gets warmer. Adjust idle and balance the carb. Later on correct the jetting as necessary (the stock SS/Monster jetting will probably not match perfectly with pod filters and maybe even an aftermarket exhaust)
If you let the engine run in the garage open all doors ! A fan placed in front of the bike may help preventing it to overheat.
16, Use clean spark plugs. Champions seem to work better than others (RA6HC for the 750, RA8HC for the 906). Gap = 0,6 mm
17, In case you'll use a modified air box you can fit a K&N DU-0900 air filter
18, You can use a Dynojet stage 1 or 2 kit from Micron (for SS or Monster) to improve performance. Specially recommended if using an aftermarket exhaust system.
This should work better than the original SS setup, but still it's highly recommended to dynorun the bike after the conversion and have the carb adjusted and jetted individually specially if you`re using pod filters and an aftermarket exhaust. (Don`t expect the bike to run perfect with the original SS jetting and that - much leaner - setup).
I didn't do this as the bike ran fine with the Dynojet kit (using a custom airbox, not pod filters), but that doesn't mean it could've worked even better.
Do check this thread: http://forums.ducatipaso.org/viewtopic.php?f=2&t=6403
The original jetting of the 750SS is:
main jet: 140
main air jet: 70
needle jet: Y-6
Jet needle: 5C19 - 3rd notch from top
Pilot jet: 37,5
Pilot air jet: 60/1.4
The original jetting of the 900SS is:
main jet: 140
main air jet: 70
needle jet: Y-2
Jet needle: 5C19 - 4th notch from top
Pilot jet: 42,5
Pilot air jet: 60/1.4
A Y-2 needle jet is leaner than a Y-6.
The later in the alphabet the larger the diameter of the needle jet.
From one letter to the next (with the same number; i.e. Q-2 to R-2) is 0,05mm difference.
From one number to the next (with the same letter; i.e. R2 to R3) is 0,005mm difference.
Hence the Y-2 is 3,11mm diameter, the Y-6 is 3,130mm.
Mikuni jets have this symbol stamped on them.
Dynojet jets have YJ and a number stamped on them instead. A Mikuni 140 main jet is not the same as a Dynojet YJ140. There are conversion tables you`ll find in the internet.
Some Mikunis have a flat float chamber cover. Others have 2 holes in the cover. These holes (which are only a bypass) are for the carb heating system. It's not important if there is a rubber plug in the holes or not, because the holes don't really go "inside" the carb and no, you won't be able to use this heating system (unluckily) because the SS/Monster oil-lines are much thinner than the ones of the Paso.
Mikuni manuals:
https://app.box.com/s/gslivfnzo4d3ak79cqs1
Last edited by paso750 on Wed Dec 27, 2006 5:46 pm, edited 1 time in total.
-
ducapaso
- paso grand pooh-bah
- Posts: 1097
- Joined: Sun Aug 01, 2004 12:00 am
- model: 750 Paso
- year: 1988
- Location: siena, italy
- Contact:
My handwork for vacuum balancing
How to build Your own vacuum balancer
Components:
1) plastic trasparent (neutral color) pipe, diameter 8 mm (3/8 inch), about 2 meters (6 feet)
2) fuel pipe (or similar) about 4 meters (12 feet)
3) one 8 mm tap
4) two small tanks for fuel pipe (fuel filter #0370083350 original ducati or similar will do)
5) two holed nozzle screwed 5mm (these must fit on the inlet mainfold too!)
6) one standing (about two meters,see picture)
7) blue water color
 water, one glass
assembling:
Cut in two parts the trasparent pipe and put the tap between them
Put the tanks at the end of the two pipes
Cut about ½ meter of fuel pipe and save it
Cut in two parts the rest of the fuel pipe, and put them on the free ends of the fuel tanks
Fit it upon a standing, the tanks on the top and the tap about in the middle
Get the water color ready, just some drop of color in the water (you don’t need to paint anything)
Put the water inside the pipe, just to fill 50% of the pipe
Screw the nuts on the inlet mainfold duct, under the carburettor (you will find two standard screws in the place; you can see the workshop manual, adjustments chapter, idling adjustment, image 22.gif and 23.gif)
Put the rest of the fuel pipe between the two nuts on the engine
Using the vacuum balancer:
_First of all you’ll need to be able to reach easly the carb, so you’l have to put the fuel tank off and provide a different fuel inlet to the carb.
_ Insert the two ends of the pipe in the two nuts you have screwed
_close the tap of the balancer
_start the engine
_open the tap.
_Now you can see how the two cylinder inlets are balanced: the water level in the plastic pipe will be skipping colse to the average vacuum level. The difference between the two levels will show you how to work: 10 mm (5/16”) is quite good, more needs to be corrected.
_Fear not to see the water flow into the engine, as a very small quantity of this will not damage anything, moreover the small tanks at the end of the plastic pipes are fitted there in order to receive the water before it’s going inside the engine.
Tuning the vacuum balance
This is the absolutely hardest thing to do. If you aren’t skilled for this, STOP NOW!!!
Otherwise you can start working on the carb.
In the workshop manual you can find how to make an idling adjustment, see 22.gif and 23.gif
Anyway it’s not enough! YOU NEED TO FIT IT FOR BEST PERFORMANCE ON MIDDLE RANGE OF RPM!!!
Turn slowly the throttle handle until ~2000 rpm
Watch the water levels: they often happen to be unbalanced, compared to the idling adjustement. It happens because of the lever and throttle shaft clearance!
This means that the throttle of the orizontal cylinder opens more than the other and this makes the forward irregular.
So, that’s what you have to do:
Stop the engine (of course!)
With your hands, turn the throttle shaft colckwise on the pump side, and with opposite spin on the lever (this is to "twist"softly the shaft).
Test the level again (close the tap before starting!)
If the handwork is not enough, try with some tool to lock the throttle shaft on the pump side and handle the lever side.
YOUR MAIN PURPOSE IS TO SAVE THE SHAFT FROM ANY DAMAGE!!!
Repeat the test and the work until vacuum lever at 2000 rpm will be good
Repeat the test at idle. You’d better have a good balancing at middle rpm range than a good idle. Bypass screws will tune the idle easier; the manual says that one sholud be fully closed and the other one opened as you need
A rich mixture will help you in riding
Have a nice work!
How to build Your own vacuum balancer
Components:
1) plastic trasparent (neutral color) pipe, diameter 8 mm (3/8 inch), about 2 meters (6 feet)
2) fuel pipe (or similar) about 4 meters (12 feet)
3) one 8 mm tap
4) two small tanks for fuel pipe (fuel filter #0370083350 original ducati or similar will do)
5) two holed nozzle screwed 5mm (these must fit on the inlet mainfold too!)
6) one standing (about two meters,see picture)
7) blue water color
assembling:
Cut in two parts the trasparent pipe and put the tap between them
Put the tanks at the end of the two pipes
Cut about ½ meter of fuel pipe and save it
Cut in two parts the rest of the fuel pipe, and put them on the free ends of the fuel tanks
Fit it upon a standing, the tanks on the top and the tap about in the middle
Get the water color ready, just some drop of color in the water (you don’t need to paint anything)
Put the water inside the pipe, just to fill 50% of the pipe
Screw the nuts on the inlet mainfold duct, under the carburettor (you will find two standard screws in the place; you can see the workshop manual, adjustments chapter, idling adjustment, image 22.gif and 23.gif)
Put the rest of the fuel pipe between the two nuts on the engine
Using the vacuum balancer:
_First of all you’ll need to be able to reach easly the carb, so you’l have to put the fuel tank off and provide a different fuel inlet to the carb.
_ Insert the two ends of the pipe in the two nuts you have screwed
_close the tap of the balancer
_start the engine
_open the tap.
_Now you can see how the two cylinder inlets are balanced: the water level in the plastic pipe will be skipping colse to the average vacuum level. The difference between the two levels will show you how to work: 10 mm (5/16”) is quite good, more needs to be corrected.
_Fear not to see the water flow into the engine, as a very small quantity of this will not damage anything, moreover the small tanks at the end of the plastic pipes are fitted there in order to receive the water before it’s going inside the engine.
Tuning the vacuum balance
This is the absolutely hardest thing to do. If you aren’t skilled for this, STOP NOW!!!
Otherwise you can start working on the carb.
In the workshop manual you can find how to make an idling adjustment, see 22.gif and 23.gif
Anyway it’s not enough! YOU NEED TO FIT IT FOR BEST PERFORMANCE ON MIDDLE RANGE OF RPM!!!
Turn slowly the throttle handle until ~2000 rpm
Watch the water levels: they often happen to be unbalanced, compared to the idling adjustement. It happens because of the lever and throttle shaft clearance!
This means that the throttle of the orizontal cylinder opens more than the other and this makes the forward irregular.
So, that’s what you have to do:
Stop the engine (of course!)
With your hands, turn the throttle shaft colckwise on the pump side, and with opposite spin on the lever (this is to "twist"softly the shaft).
Test the level again (close the tap before starting!)
If the handwork is not enough, try with some tool to lock the throttle shaft on the pump side and handle the lever side.
YOUR MAIN PURPOSE IS TO SAVE THE SHAFT FROM ANY DAMAGE!!!
Repeat the test and the work until vacuum lever at 2000 rpm will be good
Repeat the test at idle. You’d better have a good balancing at middle rpm range than a good idle. Bypass screws will tune the idle easier; the manual says that one sholud be fully closed and the other one opened as you need
A rich mixture will help you in riding
Have a nice work!
Last edited by ducapaso on Mon Sep 14, 2015 6:57 am, edited 3 times in total.
have a nice ride, Nicola
Black "DUKE" 751582
ex...Red "smooth" 753349
Black "DUKE" 751582
ex...Red "smooth" 753349
-
jcslocum
- paso grand pooh-bah
- Posts: 1714
- Joined: Mon Jul 19, 2004 12:00 am
- model: 750 Paso
- year: 1988
- Location: Eastern Shore, MD
- Contact:
Engine Transplants
The subject of swapping other engines for the stock Pantah 750 comes up once in a while. It can be done but it's difficult. Heres a link to the discussion on swapping in a 900 engine:
Engine Swap/Transplant
Engine Swap/Transplant